参考视频
一、Spring Boot入门 1. Spring Boot简介
简化Spring应用开发的一个框架;
整个Spring技术栈的一个大整合;
J2EE开发的一站式解决方案;
2. 微服务 2014,Martin Fowler
微服务:架构风格
一个应用应该是一族小型服务;可以通过HTTP的方式进行互通;
单体应用:ALL IN ONE
微服务:每一个功能元素最终都是一个可独立替换和独立升级的软件单元;
详细参照微服务文档
环境约束
-jdk1.8
-maven3.x
-Intellij IDEA
-SpringBoot
3. 环境准备 3.1 MAVEN设置 给maven的settings.xml配置文件的profiles标签添加
1 2 3 4 5 6 7 8 9 10 11 12 13 <profile > <id > jdk-1.8</id > <activation > <activeByDefault > true</activeByDefault > <jdk > 1.8</jdk > </activation > <properties > <maven.compiler.source > 1.8</maven.compiler.source > <maven.compiler.target > 1.8</maven.compiler.target > <maven.compiler.compilerVersion > 1.8</maven.compiler.compilerVersion > </properties > </profile >
3.2 IDEA设置
4. Spring Boot HelloWorld 一个功能
浏览器发送hello请求,服务器接收请求处理,响应HelloWorld字符串;
4.1 创建一个maven工程;(jar) 4.2 导入springboot相关依赖 1 2 3 4 5 6 7 8 9 10 11 12 <parent> <groupId>org.springframework.boot</groupId> <artifactId>spring-boot-starter-parent</artifactId> <version>2.2.5.RELEASE</version> <relativePath/> <!-- lookup parent from repository --> </parent> <dependencies> <dependency> <groupId>org.springframework.boot</groupId> <artifactId>spring-boot-starter-web</artifactId> </dependency> </dependencies>
4.3 编写一个主程序,启动Spring Boot应用 1 2 3 4 5 6 7 8 9 10 11 @SpringBootApplication public class HelloWorldMainApplication { public static void main (String[] args) { SpringApplication.run(HelloWorldMainApplication.class, args); } }
4.4 编写相关的controller、service 1 2 3 4 5 6 7 8 9 10 @Controller public class HelloController { @ResponseBody @RequestMapping("/hello") public String hello () { return "hello world!" ; } }
4.5 运行主程序测试 4.6 简化部署 1 2 3 4 5 6 7 8 9 <build > <plugins > <plugin > <groupId > org.springframework.boot</groupId > <artifactId > spring-boot-maven-plugin</artifactId > </plugin > </plugins > </build >
将这个应用打成jar包,直接使用java -jar的命令进行执行
5. Hello World探究 5.1 POM文件 5.1.1 父项目 1 2 3 4 5 6 7 8 9 10 11 12 13 14 <parent> <groupId>org.springframework.boot</groupId> <artifactId>spring-boot-starter-parent</artifactId> <version>2.2.5.RELEASE</version> <relativePath/> <!-- lookup parent from repository --> </parent> 他的父项目是: <parent> <groupId>org.springframework.boot</groupId> <artifactId>spring-boot-dependencies</artifactId> <version>2.2.5.RELEASE</version> <relativePath>../../spring-boot-dependencies</relativePath> </parent> 他来真正管理Spring Boot应用里面的所有依赖版本
Spring Boot的版本仲裁中心;
以后我们导入依赖默认是不需要写版本的;(没有在dependencies里面管理的依赖自然需要声明版本号)
5.1.2 启动器 1 2 3 4 5 <dependency > <groupId > org.springframework.boot</groupId > <artifactId > spring-boot-starter-web</artifactId > </dependency >
spring-boot-starter -==web==
spring-boot-starter:spring-boot场景启动器;帮我们导入了web模块征程运行所依赖的组件;
Spring Boot将所有的功能场景都抽取出来,做成一个个starters(启动器),只需要在项目里引入这些starter,相关场景的所有依赖都会导入进来。要用什么功能就导入什么场景的启动器。
5.2 主程序类,主入口类 1 2 3 4 5 6 7 8 9 10 11 @SpringBootApplication public class HelloWorldMainApplication { public static void main (String[] args) { SpringApplication.run(HelloWorldMainApplication.class, args); } }
@SpringBootApplication :Spring Boot应用标注在某个类上说明这个类是SpringBoot的主配置类,SpringBoot
就应该运行这个类的main方法来启动SpringBoot应用;
1 2 3 4 5 6 7 8 9 10 11 12 13 14 15 16 17 18 19 @Target({ElementType.TYPE}) @Retention(RetentionPolicy.RUNTIME) @Documented @Inherited @SpringBootConfiguration @EnableAutoConfiguration @ComponentScan( excludeFilters = {@Filter( type = FilterType.CUSTOM, classes = {TypeExcludeFilter.class} ), @Filter( type = FilterType.CUSTOM, classes = {AutoConfigurationExcludeFilter.class} )} ) public @interface SpringBootApplication {}
@SpringBootConfiguration :Spring Boot的配置类;
标注在某个类上,表示这是一个Spring Boot的配置类
@Configuration :配置类上标注这个注解;
配置类 —— 配置文件;配置类也是容器中的一个组件;@Component
@EnableAutoConfiguration :开启自动配置功能
以前我们需要配置的东西,Spring Boot帮我们自动配置;@EnableAutoConfiguration告诉SpringBoot开启
1 2 3 4 5 6 @AutoConfigurationPackage @Import({AutoConfigurationImportSelector.class}) public @interface EnableAutoConfiguration {}
@AutoConfigurationPackage :自动配置包
@Import ({Registrar.class});
spring的底层注解@import,给容器中导入一个组件;导入的组件由Registrar.class;
==将主配置类(@SpringBootApplication标注的类)的所在包及下面所有子包里面的所有组件扫描到spring容器;==
@Import ({AutoConfigurationImportSelector.class});
给容器中导入组件?
AutoConfigurationImportSelector.class:导入哪些组件的选择器;
将所有需要导入的组件以全类名的方式返回;这些组件就会被添加到容器中;
会给容器中导入非常多的自动配置类(xxxAutoConfiguration);就是给容器中导入这个场景需要的所有组件,并配置好这些组件。
有了自动配置类,免去了我们手动编写配置注入功能组件等工作;
SpringFactoriesLoader.loadFactoryNames(EnableAutoConfiguration.class, classLoader);
==SpringBoot在启动的时候,从类路径下的META-INF/spring.factories中获取EnableAutoConfiguration指定的值,将这些值作为自动配置类导入到容器中,自动配置类就生效,帮我们进行自动配置工作;==以前我们需要自己配置的东西,自动帮我们配置了;
J2EE的整体整合解决方案和自动配置都在spring-boot-autoconfigure-2.2.5.RELEASE.jar中;
6. 使用Spring Initializer快速穿建Spring Boot项目 IDE都支持使用Spring的项目穿建向导快速穿建一个Spring Boot项目;
选择我们需要的模块;向导会联网创建Spring Boot项目;
默认生成的Spring Boot项目;
主程序已经生成好了,我们只需要写自己的逻辑
resources文件夹中的目录结构
static:保存所有的静态资源;css js image
templates:保存所有的模板页面;(spring
application.properties:Spring Boot应用的配置文件,可以修改一些默认配置
二、配置文件 1. 配置文件 SpringBoot使用一个全局配置文件,配置文件名是固定的;
application.properties
application.yml
配置文件的作用:修改springboot自动配置的默认值;springboot在底层都给我们配置好了;
YAML(YAML Ain’t Markup Language)
YAML A Markup Language:是一个标记语言
YAML isn’t Markup Language:不是一个标记语言
标记语言:
以前的配置文件,大多都使用xxx.xml文件;
YAML:==以数据为中心==,比json、xml等更适合做配置文件;
YAML:配置列子
XML:
1 2 3 4 <server > <port > 8081</port > </server >
2. YAML语法 2.1 基本语法 k:(空格)v:表示一对键值对(空格必须有);
以空格的缩进来控制层级关系;只要是左对齐的一列数据,都是同一层级的
1 2 3 server: port: 8081 path: /hello
属性和值也是大小写没敢;
2.2 值的写法 字面量:普通的值(数字,字符串,布尔) k: v:字面量直接来写;
字符串默认不用加上单引号或者双引号;
“”:双引号:不会转义字符串里面的特殊字符;特殊字符会作为本身想表达的意思
name: “zhangsan \n lisi” 输出:zhangsan 换行 lisi
‘’:单引号:会转义特殊字符,
name: “zhangsan \n lisi” 输出:zhangsan \n lisi
对象、Map(属性和值)(键值对) k: v:在下一行来写对象的属性和值的关系;注意缩进
对象还是k: v的方式
1 2 3 friends: name: zhansan age: 20
行内写法:
1 friends: { name: zhansan ,age: 20 }
数组(List、Set) 用- 值表示数组中的一个元素
1 2 3 4 pets: - cat - dog - pig
行内写法:
3. 配置文件值注入 配置文件:
1 2 3 4 5 6 7 8 9 10 11 12 person: lastName: zhangsan age: 20 boss: false birth: 2000 /1/1 maps: { k1: v1 ,k2: 12 } lists: - lisi - zhaoliu dog: name: gou age: 1
javabean:
1 2 3 4 5 6 7 8 9 10 11 12 13 14 15 16 17 18 19 @Component @ConfigurationProperties(prefix = "person") public class Person { private String lastName; private Integer age; private Boolean boss; private Date birth; private Map<String, Object> maps; private List<Object> lists; private Dog dog; }
我们可以导入配置文件处理器,以后编写配置就有提示了
1 2 3 4 5 <dependency > <groupId > org.springframework.boot</groupId > <artifactId > spring-boot-configuration-processor</artifactId > </dependency >
3.1 properties配置文件在idea中默认utf-8可能会乱码
3.2 @value获取值和@ConfigurationProperties获取值比较
@ConfigurationProperties
@value
功能
批量注入配置文件中的属性
一个个指定
松散绑定(松散语法)
支持
不支持
SpEL
不支持
支持
JSR303数据校验
支持
不支持
复杂类型封装
支持
不支持
配置文件yml还是properties他们都能获取到值;
如果说,我们只是在某个业务逻辑中需要获取一下配置文件中的某项值,使用@Value;
如果说,我们专门编写了一个javaBean来和配置文件进行映射,我们就直接使用@ConfigurationProperties;
3.3 配置文件注入值数据校验 1 2 3 4 5 6 7 8 9 10 11 12 13 14 15 16 17 18 19 20 21 22 23 24 25 26 27 28 @Component @ConfigurationProperties(prefix = "person") @Validated public class Person { @Email private String lastName; private Integer age; private Boolean boss; private Date birth; private Map<String, Object> maps; private List<Object> lists; private Dog dog; }
3.4 @PropertySource&@ImportResource @PropertySource :加载指定配置文件
1 2 3 4 5 6 7 8 9 10 11 12 13 14 15 16 17 18 19 20 21 22 23 24 25 @PropertySource(value = {"classpath:person.properties"}) @Component @ConfigurationProperties(prefix = "person") public class Person { private String lastName; private Integer age; private Boolean boss; }
@ImportResource :导入spring的配置文件,让配置文件里面的内容生效;
Spring Boot里面没有spring的配置文件,我们自己编写的配置文件,也不能自动识别;
想让spring的配置文件生效,加载进来;@ImportResource 标注在一个配置类上
1 2 3 4 5 @ImportResource(locations = "classpath:beans.xml") public class C {}
不来编写Spring的配置文件
1 2 3 4 5 6 7 8 <?xml version="1.0" encoding="UTF-8"?> <beans xmlns="http://www.springframework.org/schema/beans" xmlns:xsi="http://www.w3.org/2001/XMLSchema-instance" xsi:schemaLocation="http://www.springframework.org/schema/beans http://www.springframework.org/schema/beans/spring-beans.xsd"> <bean id="helloService" class="com.study.springboot.service.HelloService"/> </beans>
SpringBoot推荐给容器中添加组件的方式;推荐使用全注解的方式
1、配置类 ==== Spring配置文件
2、使用@Bean给容器添加组件
1 2 3 4 5 6 7 8 9 10 11 12 13 14 15 16 @Configuration public class MyAppConfig { @Bean public HelloService helloService02 () { System.out.println("配置类@Bean组件添加成功" ); return new HelloService (); } }
4. 配置文件占位符 4.1 随机数 1 2 random.value、{random.int}、${random.long} random.int(10)、{random.int[1024, 65536]}
4.2 占位符获取之前配置的值,如果没有可以用:指定默认值 1 2 3 4 5 6 7 8 9 person.last-name =张三${random.uuid} person.age =${random.int(28)} person.birth =1999/1/1 person.boss =true person.maps.k1 =v1 person.maps.k2 =22 person.lists =a,b,c person.dog.name =${person.hello:hello}_dog person.dog.age =3
5. Profile 5.1 多profile文件 我们在主配置文件编写的时候,文件名可以是 application-{profile}.properties/yml
默认使用application.properties
5.2 yml支持多文档块方式 1 2 3 4 5 6 7 8 9 10 11 12 13 14 15 16 17 18 server: port: 8081 spring: profiles: active: dev --- server: port: 8083 spring: profiles: dev --- server: port: 8084 spring: profiles: prod
5.3 激活指定profile
在配置文件中指定 spring.profiles.active=dev
命令行:
1 2 java -jar spring-boot-01-helloworld-1.0-SNAPSHOT.jar --spring.profiles.active=dev
虚拟机参数;
1 -Dspring.profiles.active=dev
6. 配置文件加载位置 springboot启动会自动扫描一下位置的application.xml或者application.yml文件作为Springboot的默认配置文件
-file: ./config/
-file: ./
-classpath: ./config/
-classpath: ./
优先级由高到低,高优先级的配置会覆盖低优先级的配置;
SpringBoot会从这四个位置全部加载主配置文件;互补配置 ;
==我们还可以通过spring.config.location来改变默认的配置文件的位置==
**项目打包号以后,我们可以使用命令行参数的形式,启动项目的时候来指定配置文件的新位置;指定配置文件和默认加载的这些配置文件共同起作用形成互补配置;
7. 外部配置加载顺序 **SpringBoot也可以从以下位置加载配置;优先级从高到低;高优先级的配置覆盖低优先级的配置,所有的配置会形成互补配置;
命令行参数
1 java -jar spring-boot-01-helloworld-1.0-SNAPSHOT.jar --server.port=8082 --server.context-path=/abc
来自:java:comp/env的JNDI属性
Java系统属性(System.getProperties())
操作系统环境变量
RandomValuePropertySource配置的random.*属性值
**jar包外部的application-{profile}.properties或application-{profile}.yml(带spring.profile)配置文件
**jar包内部的application-{profile}.properties或application-{profile}.yml(带spring.profile)配置文件
jar包外部的application.properties或application.yml(不带spring.profile)配置文件 jar包内部的application.properties或application.yml(不带spring.profile)配置文件 @Configuration注解上的@PropertySource
通过SpringApplication.setDefaultProperties指定的默认属性
所有支持的配置加载来源,参考官方文档
8. 自动配置原理 配置文件到底能写什么?怎么写?自动配置原理;
配置文件能配置的属性参照
8.1 自动配置原理 1)springboot启动的时候加载主配置类,开启了自动配置功能==@EnableAutoConfiguration==
2)@EnableAutoConfiguration作用:
利用AutoConfigurationImportSelector给容器中导入一些组件?
可以查找selectImports()方法的内容;
List configurations = this.getCandidateConfigurations(annotationMetadata, attributes)
1 2 3 4 SpringFactoriesLoader.loadFactoryNames() 扫描所有jar包类路径下 META-INF/spring.factories 把扫描到的这些文件的内容包装成properties对象 从properties中获取到EnableAutoConfiguration.class类(类名)对应的值,然后把他们添加到容器中
**==将类路径下META-INF/spring.factories里面配置的所有EnableAutoConfiguration的值加入到了容器中;==
1 2 3 4 5 6 7 8 9 10 11 12 13 14 15 16 17 18 19 20 21 22 23 24 25 26 27 28 29 30 31 32 33 34 35 36 37 38 39 40 41 42 43 44 45 46 47 48 49 50 51 52 53 54 55 56 57 58 59 60 61 62 63 64 65 66 67 68 69 70 71 72 73 74 75 76 77 78 79 80 81 82 83 84 85 86 87 88 89 90 91 92 93 94 95 96 97 98 99 100 101 102 103 104 105 106 107 108 109 110 111 112 113 114 115 116 117 118 119 120 121 122 123 124 125 126 org.springframework.boot.autoconfigure.EnableAutoConfiguration =\ org.springframework.boot.autoconfigure.admin.SpringApplicationAdminJmxAutoConfiguration,\ org.springframework.boot.autoconfigure.aop.AopAutoConfiguration,\ org.springframework.boot.autoconfigure.amqp.RabbitAutoConfiguration,\ org.springframework.boot.autoconfigure.batch.BatchAutoConfiguration,\ org.springframework.boot.autoconfigure.cache.CacheAutoConfiguration,\ org.springframework.boot.autoconfigure.cassandra.CassandraAutoConfiguration,\ org.springframework.boot.autoconfigure.cloud.CloudServiceConnectorsAutoConfiguration,\ org.springframework.boot.autoconfigure.context.ConfigurationPropertiesAutoConfiguration,\ org.springframework.boot.autoconfigure.context.MessageSourceAutoConfiguration,\ org.springframework.boot.autoconfigure.context.PropertyPlaceholderAutoConfiguration,\ org.springframework.boot.autoconfigure.couchbase.CouchbaseAutoConfiguration,\ org.springframework.boot.autoconfigure.dao.PersistenceExceptionTranslationAutoConfiguration,\ org.springframework.boot.autoconfigure.data.cassandra.CassandraDataAutoConfiguration,\ org.springframework.boot.autoconfigure.data.cassandra.CassandraReactiveDataAutoConfiguration,\ org.springframework.boot.autoconfigure.data.cassandra.CassandraReactiveRepositoriesAutoConfiguration,\ org.springframework.boot.autoconfigure.data.cassandra.CassandraRepositoriesAutoConfiguration,\ org.springframework.boot.autoconfigure.data.couchbase.CouchbaseDataAutoConfiguration,\ org.springframework.boot.autoconfigure.data.couchbase.CouchbaseReactiveDataAutoConfiguration,\ org.springframework.boot.autoconfigure.data.couchbase.CouchbaseReactiveRepositoriesAutoConfiguration,\ org.springframework.boot.autoconfigure.data.couchbase.CouchbaseRepositoriesAutoConfiguration,\ org.springframework.boot.autoconfigure.data.elasticsearch.ElasticsearchAutoConfiguration,\ org.springframework.boot.autoconfigure.data.elasticsearch.ElasticsearchDataAutoConfiguration,\ org.springframework.boot.autoconfigure.data.elasticsearch.ElasticsearchRepositoriesAutoConfiguration,\ org.springframework.boot.autoconfigure.data.elasticsearch.ReactiveElasticsearchRepositoriesAutoConfiguration,\ org.springframework.boot.autoconfigure.data.elasticsearch.ReactiveRestClientAutoConfiguration,\ org.springframework.boot.autoconfigure.data.jdbc.JdbcRepositoriesAutoConfiguration,\ org.springframework.boot.autoconfigure.data.jpa.JpaRepositoriesAutoConfiguration,\ org.springframework.boot.autoconfigure.data.ldap.LdapRepositoriesAutoConfiguration,\ org.springframework.boot.autoconfigure.data.mongo.MongoDataAutoConfiguration,\ org.springframework.boot.autoconfigure.data.mongo.MongoReactiveDataAutoConfiguration,\ org.springframework.boot.autoconfigure.data.mongo.MongoReactiveRepositoriesAutoConfiguration,\ org.springframework.boot.autoconfigure.data.mongo.MongoRepositoriesAutoConfiguration,\ org.springframework.boot.autoconfigure.data.neo4j.Neo4jDataAutoConfiguration,\ org.springframework.boot.autoconfigure.data.neo4j.Neo4jRepositoriesAutoConfiguration,\ org.springframework.boot.autoconfigure.data.solr.SolrRepositoriesAutoConfiguration,\ org.springframework.boot.autoconfigure.data.redis.RedisAutoConfiguration,\ org.springframework.boot.autoconfigure.data.redis.RedisReactiveAutoConfiguration,\ org.springframework.boot.autoconfigure.data.redis.RedisRepositoriesAutoConfiguration,\ org.springframework.boot.autoconfigure.data.rest.RepositoryRestMvcAutoConfiguration,\ org.springframework.boot.autoconfigure.data.web.SpringDataWebAutoConfiguration,\ org.springframework.boot.autoconfigure.elasticsearch.jest.JestAutoConfiguration,\ org.springframework.boot.autoconfigure.elasticsearch.rest.RestClientAutoConfiguration,\ org.springframework.boot.autoconfigure.flyway.FlywayAutoConfiguration,\ org.springframework.boot.autoconfigure.freemarker.FreeMarkerAutoConfiguration,\ org.springframework.boot.autoconfigure.gson.GsonAutoConfiguration,\ org.springframework.boot.autoconfigure.h2.H2ConsoleAutoConfiguration,\ org.springframework.boot.autoconfigure.hateoas.HypermediaAutoConfiguration,\ org.springframework.boot.autoconfigure.hazelcast.HazelcastAutoConfiguration,\ org.springframework.boot.autoconfigure.hazelcast.HazelcastJpaDependencyAutoConfiguration,\ org.springframework.boot.autoconfigure.http.HttpMessageConvertersAutoConfiguration,\ org.springframework.boot.autoconfigure.http.codec.CodecsAutoConfiguration,\ org.springframework.boot.autoconfigure.influx.InfluxDbAutoConfiguration,\ org.springframework.boot.autoconfigure.info.ProjectInfoAutoConfiguration,\ org.springframework.boot.autoconfigure.integration.IntegrationAutoConfiguration,\ org.springframework.boot.autoconfigure.jackson.JacksonAutoConfiguration,\ org.springframework.boot.autoconfigure.jdbc.DataSourceAutoConfiguration,\ org.springframework.boot.autoconfigure.jdbc.JdbcTemplateAutoConfiguration,\ org.springframework.boot.autoconfigure.jdbc.JndiDataSourceAutoConfiguration,\ org.springframework.boot.autoconfigure.jdbc.XADataSourceAutoConfiguration,\ org.springframework.boot.autoconfigure.jdbc.DataSourceTransactionManagerAutoConfiguration,\ org.springframework.boot.autoconfigure.jms.JmsAutoConfiguration,\ org.springframework.boot.autoconfigure.jmx.JmxAutoConfiguration,\ org.springframework.boot.autoconfigure.jms.JndiConnectionFactoryAutoConfiguration,\ org.springframework.boot.autoconfigure.jms.activemq.ActiveMQAutoConfiguration,\ org.springframework.boot.autoconfigure.jms.artemis.ArtemisAutoConfiguration,\ org.springframework.boot.autoconfigure.groovy.template.GroovyTemplateAutoConfiguration,\ org.springframework.boot.autoconfigure.jersey.JerseyAutoConfiguration,\ org.springframework.boot.autoconfigure.jooq.JooqAutoConfiguration,\ org.springframework.boot.autoconfigure.jsonb.JsonbAutoConfiguration,\ org.springframework.boot.autoconfigure.kafka.KafkaAutoConfiguration,\ org.springframework.boot.autoconfigure.ldap.embedded.EmbeddedLdapAutoConfiguration,\ org.springframework.boot.autoconfigure.ldap.LdapAutoConfiguration,\ org.springframework.boot.autoconfigure.liquibase.LiquibaseAutoConfiguration,\ org.springframework.boot.autoconfigure.mail.MailSenderAutoConfiguration,\ org.springframework.boot.autoconfigure.mail.MailSenderValidatorAutoConfiguration,\ org.springframework.boot.autoconfigure.mongo.embedded.EmbeddedMongoAutoConfiguration,\ org.springframework.boot.autoconfigure.mongo.MongoAutoConfiguration,\ org.springframework.boot.autoconfigure.mongo.MongoReactiveAutoConfiguration,\ org.springframework.boot.autoconfigure.mustache.MustacheAutoConfiguration,\ org.springframework.boot.autoconfigure.orm.jpa.HibernateJpaAutoConfiguration,\ org.springframework.boot.autoconfigure.quartz.QuartzAutoConfiguration,\ org.springframework.boot.autoconfigure.rsocket.RSocketMessagingAutoConfiguration,\ org.springframework.boot.autoconfigure.rsocket.RSocketRequesterAutoConfiguration,\ org.springframework.boot.autoconfigure.rsocket.RSocketServerAutoConfiguration,\ org.springframework.boot.autoconfigure.rsocket.RSocketStrategiesAutoConfiguration,\ org.springframework.boot.autoconfigure.security.servlet.SecurityAutoConfiguration,\ org.springframework.boot.autoconfigure.security.servlet.UserDetailsServiceAutoConfiguration,\ org.springframework.boot.autoconfigure.security.servlet.SecurityFilterAutoConfiguration,\ org.springframework.boot.autoconfigure.security.reactive.ReactiveSecurityAutoConfiguration,\ org.springframework.boot.autoconfigure.security.reactive.ReactiveUserDetailsServiceAutoConfiguration,\ org.springframework.boot.autoconfigure.security.rsocket.RSocketSecurityAutoConfiguration,\ org.springframework.boot.autoconfigure.security.saml2.Saml2RelyingPartyAutoConfiguration,\ org.springframework.boot.autoconfigure.sendgrid.SendGridAutoConfiguration,\ org.springframework.boot.autoconfigure.session.SessionAutoConfiguration,\ org.springframework.boot.autoconfigure.security.oauth2.client.servlet.OAuth2ClientAutoConfiguration,\ org.springframework.boot.autoconfigure.security.oauth2.client.reactive.ReactiveOAuth2ClientAutoConfiguration,\ org.springframework.boot.autoconfigure.security.oauth2.resource.servlet.OAuth2ResourceServerAutoConfiguration,\ org.springframework.boot.autoconfigure.security.oauth2.resource.reactive.ReactiveOAuth2ResourceServerAutoConfiguration,\ org.springframework.boot.autoconfigure.solr.SolrAutoConfiguration,\ org.springframework.boot.autoconfigure.task.TaskExecutionAutoConfiguration,\ org.springframework.boot.autoconfigure.task.TaskSchedulingAutoConfiguration,\ org.springframework.boot.autoconfigure.thymeleaf.ThymeleafAutoConfiguration,\ org.springframework.boot.autoconfigure.transaction.TransactionAutoConfiguration,\ org.springframework.boot.autoconfigure.transaction.jta.JtaAutoConfiguration,\ org.springframework.boot.autoconfigure.validation.ValidationAutoConfiguration,\ org.springframework.boot.autoconfigure.web.client.RestTemplateAutoConfiguration,\ org.springframework.boot.autoconfigure.web.embedded.EmbeddedWebServerFactoryCustomizerAutoConfiguration,\ org.springframework.boot.autoconfigure.web.reactive.HttpHandlerAutoConfiguration,\ org.springframework.boot.autoconfigure.web.reactive.ReactiveWebServerFactoryAutoConfiguration,\ org.springframework.boot.autoconfigure.web.reactive.WebFluxAutoConfiguration,\ org.springframework.boot.autoconfigure.web.reactive.error.ErrorWebFluxAutoConfiguration,\ org.springframework.boot.autoconfigure.web.reactive.function.client.ClientHttpConnectorAutoConfiguration,\ org.springframework.boot.autoconfigure.web.reactive.function.client.WebClientAutoConfiguration,\ org.springframework.boot.autoconfigure.web.servlet.DispatcherServletAutoConfiguration,\ org.springframework.boot.autoconfigure.web.servlet.ServletWebServerFactoryAutoConfiguration,\ org.springframework.boot.autoconfigure.web.servlet.error.ErrorMvcAutoConfiguration,\ org.springframework.boot.autoconfigure.web.servlet.HttpEncodingAutoConfiguration,\ org.springframework.boot.autoconfigure.web.servlet.MultipartAutoConfiguration,\ org.springframework.boot.autoconfigure.web.servlet.WebMvcAutoConfiguration,\ org.springframework.boot.autoconfigure.websocket.reactive.WebSocketReactiveAutoConfiguration,\ org.springframework.boot.autoconfigure.websocket.servlet.WebSocketServletAutoConfiguration,\ org.springframework.boot.autoconfigure.websocket.servlet.WebSocketMessagingAutoConfiguration,\ org.springframework.boot.autoconfigure.webservices.WebServicesAutoConfiguration,\ org.springframework.boot.autoconfigure.webservices.client.WebServiceTemplateAutoConfiguration
每一个这样的 xxxAutoConfiguration类都是容器中的一个组件,都加入到容器中;用他们来自动配置;
3)每一个自动配置类进行自动配置功能;
4)以HttpEncodingAutoConfiguration(Http编码自动配置) 为例解释自动配置原理;
1 2 3 4 5 6 7 8 9 10 11 12 13 14 15 16 17 18 19 20 21 22 23 24 25 26 27 28 29 30 @Configuration(proxyBeanMethods = false) @EnableConfigurationProperties(HttpProperties.class) @ConditionalOnWebApplication(type = ConditionalOnWebApplication.Type.SERVLET) @ConditionalOnClass(CharacterEncodingFilter.class) @ConditionalOnProperty(prefix = "spring.http.encoding", value = "enabled", matchIfMissing = true) public class HttpEncodingAutoConfiguration { private final HttpProperties.Encoding properties; public HttpEncodingAutoConfiguration (HttpProperties properties) { this .properties = properties.getEncoding(); } @Bean @ConditionalOnMissingBean public CharacterEncodingFilter characterEncodingFilter () { CharacterEncodingFilter filter = new OrderedCharacterEncodingFilter (); filter.setEncoding(this .properties.getCharset().name()); filter.setForceRequestEncoding(this .properties.shouldForce(Type.REQUEST)); filter.setForceResponseEncoding(this .properties.shouldForce(Type.RESPONSE)); return filter; } }
根据当前不同的条件判断,决定这个配置类是否生效?
一旦这个配置类生效;这个配置类就会给容器中添加各种组件;这些组件的属性是从对应的properties类中获取的,这些类里面的每一个属性又是和配置文件绑定的;
5)所有在配置文件中能配置的属性都是在xxxxProperties类中封装着;配置文件能配什么就可以参照某个功能对应的这个属性类
1 2 3 4 5 6 7 8 9 10 11 12 13 14 15 16 17 18 19 20 21 22 23 24 25 26 27 28 29 30 31 32 33 34 35 @ConfigurationProperties(prefix = "spring.http") public class HttpProperties { private boolean logRequestDetails; private final Encoding encoding = new Encoding (); public boolean isLogRequestDetails () { return this .logRequestDetails; } public void setLogRequestDetails (boolean logRequestDetails) { this .logRequestDetails = logRequestDetails; } public Encoding getEncoding () { return this .encoding; } public static class Encoding { public static final Charset DEFAULT_CHARSET = StandardCharsets.UTF_8; } }
精髓:
1)SpringBoot启动会加载大量的自动配置类
2)看我们需要的功能有没有SpringBoot默认写好的自动配置类;
3)我们再来看这个自动配置类中到底配置了哪些组件;(只要我们要用的组件有,我们就不需要再来配置了)
**4)给容器中自动配置类添加组件的时候,会从properties类中获取某些属性。我们就可以在配置文件中指定这些属性的值;
xxxAutoConfiguration:自动配置类;
给容器中添加组件
xxxProperties:封装配置文件中相关属性;
8.2 细节 8.2.1 @Conditional派生注解(Spring注解版原生的@Conditional作用) 作用:必须是@Conditional指定的条件成立,才给容器中添加组件,配置里面的所有内容才生效;
@Conditional注解扩展
作用(判断是否满足当前指定条件)
@ConditionalOnJava
系统的java版本是否符合要求
@ConditionalOnBean
容器中存在指定Bean
@ConditionalOnMissingBean
容器中不存在指定Bean
@ConditionalOnExpression
满足SpEL表达式
@ConditionalOnClass
系统中有指定的类
@ConditionalOnMisssingClass
系统中没有指定的类
@ConditionalOnSingleCandidate
容器中只有一个指定的Bean,或者这个Bean是首选Bean
@ConditionalOnProperty
系统中指定的属性是否有指定的值
@ConditionalOnResource
类路径下是否存在指定资源文件
@ConditionalOnWebApplication
当前是Web环境
@ConditionalOnNotWebApplication
当前不是Web环境
@ConditionalOnJndi
JNDI存在指定项
自动配置类必须在一定条件下才能生效;
我们怎么知道哪些自动配置类生效?
可以通过启动 debug=true属性,来让控制台打印自动配置报告;
1 2 3 4 5 6 7 8 9 10 11 12 13 14 15 16 17 18 19 20 21 22 23 ============================ CONDITIONS EVALUATION REPORT ============================ Positive matches:(自动配置类启用的) ----------------- AopAutoConfiguration matched: - @ConditionalOnProperty (spring.aop.auto=true) matched (OnPropertyCondition) AopAutoConfiguration.ClassProxyingConfiguration matched: - @ConditionalOnMissingClass did not find unwanted class 'org.aspectj.weaver.Advice' (OnClassCondition) - @ConditionalOnProperty (spring.aop.proxy-target-class=true) matched (OnPropertyCondition) Negative matches:(没有启用,没有匹配成功的自动配置类) ----------------- ActiveMQAutoConfiguration: Did not match: - @ConditionalOnClass did not find required class 'javax.jms.ConnectionFactory' (OnClassCondition)
三、日志 1. 日志框架 小张,开发一个大型系统;
1、System.out.println(“”);将关键数据打印在控制台;去掉?写在一个文件?
2、框架来记录系统的一些运行时信息;日志框架;zhanglogging.jar;
3、高大上的几个功能?异步模式?自动归档?xxx?zhanglogging-good.jar?
4、将以前框架卸下?换上新的框架,重新修改之前相关的API;zhanglogging-perfect.jar;
5、JDBC—数据库驱动;
写了一个统一的接口层;日志门面(日志的一个抽象层);logging-abstract.jar;
给项目中导入具体的日志实现就行了;我们之前的日志框架都是实现的抽象层;
市面上的日志框架;
JUL、JCL、Jboss-logging、logback、log4j、log4j2、slf4j……
日志门面(日志的抽象层)
日志实现
JCL(Jakarta Commons Logging) SLF4j(Simple Logging Facade for Java) Jboss-loggingLog4j JUL(JAVA.UTIL.LOGGING) Log4j2 Logback
左边选一个门面(抽象层),右边来选一个实现;
日志门面:SLF4j;
日志实现:Logback;
SpringBoot:底层是Spring框架,Spring框架默认是JCL;
SpringBoot选用SLF4j和LogBack;
2. SEL4j使用 2.1 如何在系统中使用SLF4j 以后开发的时候,日志记录方法的调用,不应该直接调用日志的实现类,而是调用日志抽象层里面的方法;
给系统里面导入slf4j的jar和 logback的实现jar
1 2 3 4 5 6 7 8 9 10 import org.slf4j.Logger;import org.slf4j.LoggerFactory;public class HelloWorld { public static void main (String[] args) { Logger logger = LoggerFactory.getLogger(HelloWorld.class); logger.info("Hello World" ); } }
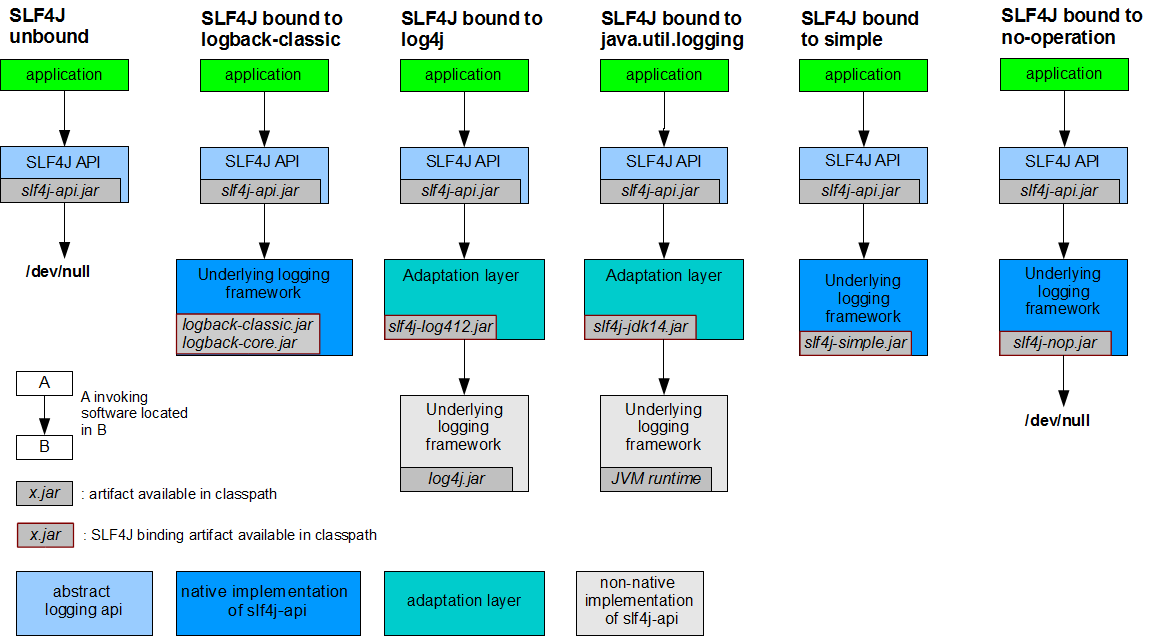
图示:
每一个日志的实现框架都有自己的配置文件。使用slf4j以后,**配置文件还是做成日志实现框架自己本身的配置文件;
2.2 遗留问题 a(slf4j+logback):Spring(commons-logging)、Hibernate(Jboss-logging)、Mybatis、xxxx
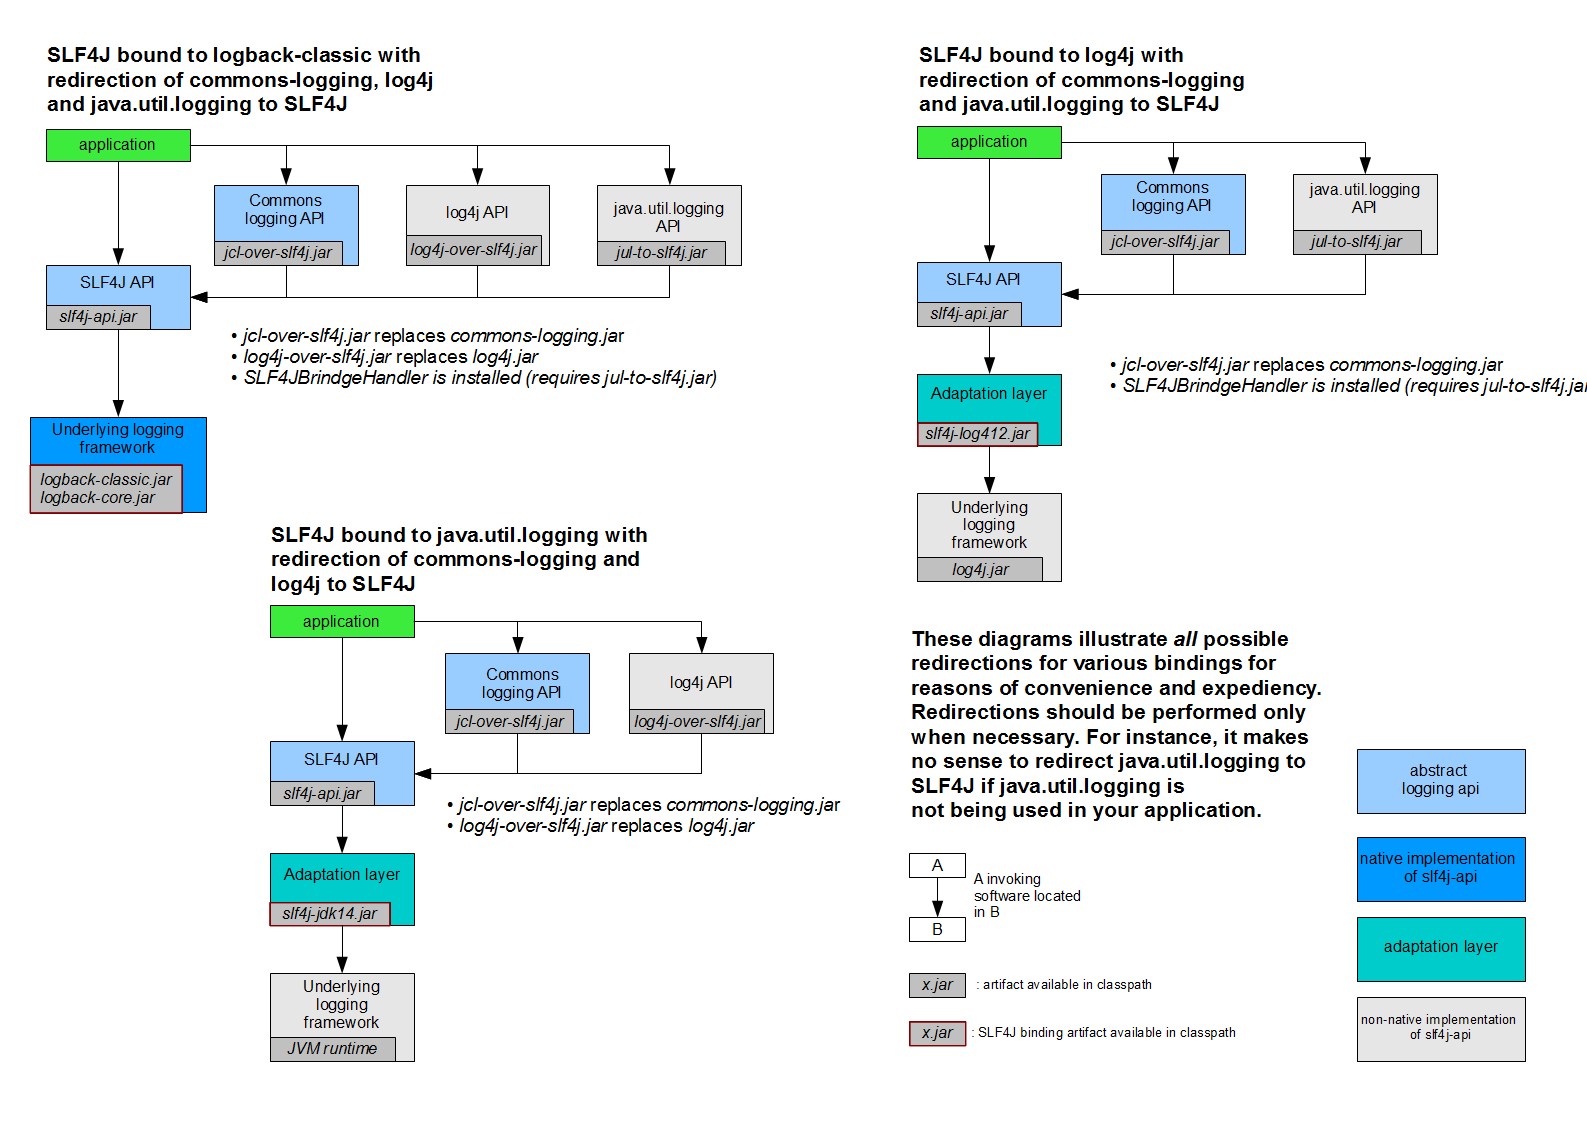
统一日志,即使是别的框架和我一起统一使用slf4j进行输出?
如何让系统中所有的日志统一到slf4j;
==1、将系统中其他日志框架先排除出去;==
==2、用中间包来替换缘由的日志框架;==
==3、我们导入slf4j其他的实现;==
2.3 SpringBoot日志关系 1 2 3 4 5 6 7 <dependency > <groupId > org.springframework.boot</groupId > <artifactId > spring-boot-starter</artifactId > <version > 2.2.5.RELEASE</version > <scope > compile</scope > </dependency >
SpringBoot使用它来做日志功能
1 2 3 4 5 6 7 <dependency > <groupId > org.springframework.boot</groupId > <artifactId > spring-boot-starter-logging</artifactId > <version > 2.2.5.RELEASE</version > <scope > compile</scope > </dependency >
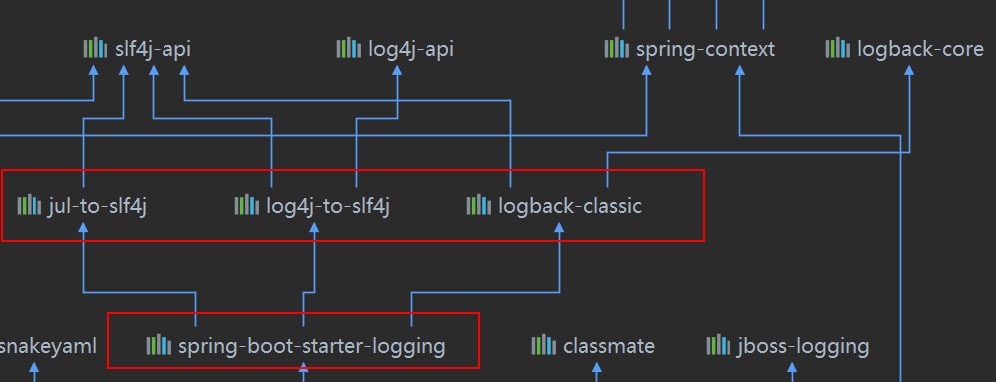
底层依赖关系
总结:
1)SpringBoot底层也是使用slf4j+logback的方式进行日志记录
2)SpringBoot也把其他的日志都替换成了slf4j
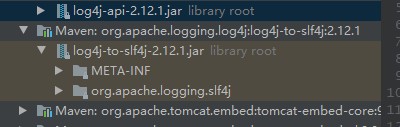
3)中间替换包?
4)如果我们要引入其他框架?一定要把这个框架的默认日志依赖移除掉?
2.4 日志使用 2.4.1 默认配置 SpringBoot默认配置好了日志;
1 2 3 4 5 6 7 8 9 10 11 12 13 14 15 16 17 18 19 public class Test { Logger logger = LoggerFactory.getLogger(getClass()); @Test void contextLoads () { logger.trace("trace log ..." ); logger.debug("debug log ..." ); logger.info("info log ..." ); logger.warn("warn log ..." ); logger.error("error log ..." ); } }
日志文件格式:
1 2 3 4 5 6 7 8 9 日志输出格式: %d表示日期时间, %thread表示线程名, %-5level:级别从左显示5个字符宽度 %logger{50} 表示logger名字最长50个字符,否则按照句点分割。 %msg:日志消息, %n是换行符 %d{yyyy-MM-dd HH:mm:ss.SSS} [%thread] %-5level %logger{50} - %msg%n
SpringBoot修改日志的默认配置
1 2 3 4 5 6 7 8 9 10 logging.level.com.study =trace logging.file.path =/spring/log logging.pattern.console =%d{yyyy-MM-dd HH:mm:ss.SSS} [%thread] %-5level %logger{50} - %msg%n logging.pattern.file =%d{yyyy-MM-dd HH:mm:ss.SSS} [%thread] %-5level %logger{50} - %msg%n
2.4.2 指定配置 给类路径下放上每个日志框架自己的配置文件即可;SpringBoot就不使用他默认配置的了
Logging System
Customization
Logback
logback-spring.xml, logback-spring.groovy, logback.xml, or logback.groovy
Log4j2
log4j2-spring.xml or log4j2.xml
JDK (Java Util Logging)
logging.properties
logback.xml:直接就被日志框架识别了;
logback-spring.xml:日志框架就不直接加载日志的配置项,由SpringBoot解析日志配置,可以使用springboot的高级profile功能
1 2 3 4 5 <springProfile name ="staging" > 可以指定某段配置只在某个环境下生效 </springProfile >
1 2 3 4 5 6 7 8 9 <appender name ="CONSOLE" class ="ch.qos.logback.core.ConsoleAppender" > <springProfile name ="dev" > <pattern > %d{yyyy-MM-dd HH:mm:ss.SSS} [%thread] %-5level %logger{50} - %msg%n</pattern > </springProfile > <springProfile name ="!dev" > <pattern > %d{yyyy-MM-dd HH:mm:ss.SSS} === [%thread] === %-5level %logger{50} - %msg%n</pattern > </springProfile > </appender >
2.5 日志框架切换 切换为log4j2:
1 2 3 4 5 6 7 8 9 10 11 12 13 14 15 <dependency> <groupId>org.springframework.boot</groupId> <artifactId>spring-boot-starter-web</artifactId> <exclusions> <exclusion> <artifactId>spring-boot-starter-logging</artifactId> <groupId>org.springframework.boot</groupId> </exclusion> </exclusions> </dependency> <dependency> <groupId>org.springframework.boot</groupId> <artifactId>spring-boot-starter-log4j2</artifactId> </dependency>
四、Web开发 1. 简介 使用Spring Boot;
1)创建SpringBoot应用,选中我们需要的模块;
2)SpringBoot已经默认将这些场景配置好了,只需要在配置文件中指定少量配置就可以运行起来;
3)自己编写业务代码;
自动配置原理?
这个场景SpringBoot帮我们配置了什么?能不能修改?能修改哪些配置?能不能扩展?xxx
1 2 xxxxAutoConfiguration:帮我们给容器中自动配置组件 xxxxProperties:配置类来封装配置文件的内容
2. SpringBoot对静态资源的映射规则 1 2 3 4 5 @ConfigurationProperties(prefix = "spring.resources", ignoreUnknownFields = false) public class ResourceProperties { }
1 2 3 4 5 6 7 8 9 10 11 12 13 14 15 16 17 18 19 20 21 22 23 24 25 26 27 28 29 30 31 32 33 34 35 36 37 38 39 40 public class TT { @Override public void addResourceHandlers (ResourceHandlerRegistry registry) { if (!this .resourceProperties.isAddMappings()) { logger.debug("Default resource handling disabled" ); return ; } Duration cachePeriod = this .resourceProperties.getCache().getPeriod(); CacheControl cacheControl = this .resourceProperties.getCache().getCachecontrol() .toHttpCacheControl(); if (!registry.hasMappingForPattern("/webjars/**" )) { customizeResourceHandlerRegistration(registry.addResourceHandler("/webjars/**" ) .addResourceLocations("classpath:/META-INF/resources/webjars/" ) .setCachePeriod(getSeconds(cachePeriod)).setCacheControl(cacheControl)); } String staticPathPattern = this .mvcProperties.getStaticPathPattern(); if (!registry.hasMappingForPattern(staticPathPattern)) { customizeResourceHandlerRegistration(registry.addResourceHandler(staticPathPattern) .addResourceLocations( getResourceLocations(this .resourceProperties.getStaticLocations())) .setCachePeriod(getSeconds(cachePeriod)).setCacheControl(cacheControl)); } } @Bean public WelcomePageHandlerMapping welcomePageHandlerMapping ( ApplicationContext applicationContext, FormattingConversionService mvcConversionService, ResourceUrlProvider mvcResourceUrlProvider) { WelcomePageHandlerMapping welcomePageHandlerMapping = new WelcomePageHandlerMapping ( new TemplateAvailabilityProviders (applicationContext), applicationContext, getWelcomePage(), this .mvcProperties.getStaticPathPattern()); welcomePageHandlerMapping.setInterceptors( getInterceptors(mvcConversionService, mvcResourceUrlProvider)); return welcomePageHandlerMapping; } }
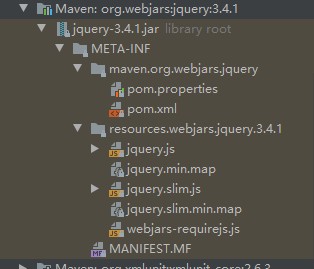
1)所有 /webjars/**,都去 classpath:/META-INF/resources/webjars/ 找资源
webjars:以jar包的方式引入静态资源;
https://www.webjars.org/
localhost:8080/webjars/jquery/3.4.1/jquery.js
1 2 3 4 5 6 7 <dependency > <groupId > org.webjars</groupId > <artifactId > jquery</artifactId > <version > 3.4.1</version > </dependency >
2)“/**”访问当前项目的任何资源,(静态资源的文件夹)
1 2 3 4 5 "classpath:/META-INF/resources/", "classpath:/resources/", "classpath:/static/", "classpath:/public/" , "/":当前项目的根路径
localhost:8080/abc === 去静态资源文件夹里面找abc
3)欢迎页;静态资源文件夹下面的所有index.html页面;被”/**”映射;
localhost:8080/ 找index页面
3. 模板引擎 JSP、Velocity、Freemarker、Thymeleaf
SpringBoot推荐的Thymeleaf;
语法更简单,功能更强大;
3.1 引入Thymeleaf 1 2 3 4 5 6 7 8 9 <dependency> <groupId>org.springframework.boot</groupId> <artifactId>spring-boot-starter-thymeleaf</artifactId> </dependency> <!--切换thymeleaf版本--> <properties> <thymeleaf.version>3.0.11.RELEASE</thymeleaf.version> <thymeleaf-layout-dialect.version>2.4.1</thymeleaf-layout-dialect.version> </properties>
3.2 Thymeleaf使用&语法 1 2 3 4 5 6 7 8 9 10 11 12 13 14 15 16 @ConfigurationProperties(prefix = "spring.thymeleaf") public class ThymeleafProperties { private static final Charset DEFAULT_ENCODING = StandardCharsets.UTF_8; public static final String DEFAULT_PREFIX = "classpath:/templates/" ; public static final String DEFAULT_SUFFIX = ".html" ; private boolean checkTemplate = true ; }
只要我们把HTML页面放在classpath:/templates/,thymeleaf就能自动渲染
1、导入themeleaf的名称空间
1 2 <html lang ="en" xmlns:th ="http://www.thymeleaf.org" >
2、使用themeleaf语法
1 2 3 4 5 6 7 8 9 10 11 12 <!DOCTYPE html > <html lang ="en" xmlns:th ="http://www.thymeleaf.org" > <head > <meta charset ="UTF-8" > <title > Title</title > </head > <body > <h1 > success</h1 > <div th:text ="${hello}" > </div > </body > </html >
3.3 语法规则 1)th:text;改变当前元素的文本规则;
th:任意html属性;来替换原生属性的值
2)表达式?
1 2 3 4 5 6 7 8 9 10 11 12 13 14 15 16 17 18 19 20 21 22 23 24 25 26 27 28 29 30 31 32 33 34 35 36 37 38 39 40 41 42 43 44 45 46 47 48 49 50 51 52 53 54 55 56 57 58 59 60 61 62 63 64 65 Simple expressions: (表达式语法) Variable Expressions: ${...} :获取变量值;OGNL 1)获取对象属性、调用方法 2)使用内置的基本对象 #ctx : the context object. #vars: the context variables. #locale : the context locale. #request : (only in Web Contexts) the HttpServletRequest object. #response : (only in Web Contexts) the HttpServletResponse object. #session : (only in Web Contexts) the HttpSession object. #servletContext : (only in Web Contexts) the ServletContext object. ${session.foo} 3)内置的一些工具对象: #execInfo : information about the template being processed. #messages : methods for obtaining externalized messages inside variables expressions, in the same way as they would be obtained using #{…} syntax. #uris : methods for escaping parts of URLs/URIs #dates : methods for java.util.Date objects: formatting, component extraction, etc. #calendars : analogous to #dates , but for java.util.Calendar objects. #numbers : methods for formatting numeric objects. #strings : methods for String objects: contains, startsWith, prepending/appending, etc. #objects : methods for objects in general. #bools : methods for boolean evaluation. #arrays : methods for arrays. #lists : methods for lists. #sets : methods for sets. #maps : methods for maps. #aggregates : methods for creating aggregates on arrays or collections. #ids : methods for dealing with id attributes that might be repeated (for example, as a result of an iteration). Selection Variable Expressions: *{...} :选择表达式:功能上和${}是一样的 补充:配合 th:object="${session.user}" <div th:object="${session.user}"> <p>Name: <span th:text="*{firstName}">Sebastian</span>.</p> <p>Surname: <span th:text="*{lastName}">Pepper</span>.</p> <p>Nationality: <span th:text="*{nationality}">Saturn</span>.</p> </div> Message Expressions: #{...} :获取国际化内容 Link URL Expressions: @{...} :定义URL @{/order/process(execId=${execId},execType='FAST')} Fragment Expressions: ~{...} :片段引用表达式 <div th:insert="~{commons :: main}">...</div> Literals(字面量) Text literals: 'one text' , 'Another one!' ,… Number literals: 0 , 34 , 3.0 , 12.3 ,… Boolean literals: true , false Null literal: null Literal tokens: one , sometext , main ,… Text operations:(文本操作) String concatenation: + Literal substitutions: |The name is ${name}| Arithmetic operations:(数学运算) Binary operators: + , - , * , / , % Minus sign (unary operator): - Boolean operations:(布尔运算) Binary operators: and , or Boolean negation (unary operator): ! , not Comparisons and equality:(比较运算) Comparators: > , < , >= , <= ( gt , lt , ge , le ) Equality operators: == , != ( eq , ne ) Conditional operators:(条件运算、三元运算) If-then: (if) ? (then) If-then-else: (if) ? (then) : (else) Default: (value) ?: (defaultvalue) Special tokens: Page 17 of 106No-Operation: _
4. SpringMVC自动配置 官方文档
4.1 Spring MVC Auto-configuration Spring Boot 自动配置好了SpringMVC
以下是SpringBoot对SpringMVC的默认:
Inclusion of ContentNegotiatingViewResolver and BeanNameViewResolver beans.
自动配置了ViewResolver(
ContentNegotiatingViewResolver:组合所有的视图解析器;
如何定制:==我们可以自己给容器中添加一个视图解析器;自动的将其组合进来;==
Support for serving static resources, including support for WebJars (later in this document ).
自动注册了 of Converter, GenericConverter, and Formatter beans.
Converter:转换器;public String hello(User);类型转换使用Converter
Formatter:格式化器;2020-3-3 === Date;
1 2 3 4 5 6 7 8 @Bean @Override public FormattingConversionService mvcConversionService() { WebConversionService conversionService = new WebConversionService(this.mvcProperties.getDateFormat()); addFormatters(conversionService); return conversionService; } //日期格式化规则
==自己添加的格式化转换器,我们只需要放在容器中即可==
Support for HttpMessageConverters (later in this document ).
HttpMessageConverters:SpringMVC用来转换Http请求和响应的;User — json
HttpMessageConverters是从容器中确定的;获取所有的HttpMessageConverters;
==自己给容器中添加HttpMessageConverters,只需要将自己的组件注册容器中(@Bean, @Component)==
Automatic registration of MessageCodesResolver (later in this document ).
Static index.html support. 静态首页访问
Custom Favicon support (later in this document ).
Automatic use of a ConfigurableWebBindingInitializer bean (later in this document ).
==我们可以配置一个ConfigurableWebBindingInitializer来替换默认的;==
1 2 初始化WebDataBinder 请求数据===JavaBean
org.springframework.boot.autoconfigure.web;web的所有自动配置场景
If you want to keep those Spring Boot MVC customizations and makeMVC customizations (@Configuration class of type WebMvcConfigurer but without @EnableWebMvc.
If you want to provide custom instancesRequestMappingHandlerMapping, RequestMappingHandlerAdapter,ExceptionHandlerExceptionResolver, and still keep the Spring Boot MVC customizations, you canWebMvcRegistrations and use it to provide custom instances of those
If you want to take complete control of Spring MVC, you can add your own @Configuration annotated@EnableWebMvc, or alternatively add your own @ConfigurationDelegatingWebMvcConfiguration as described in the Javadoc of @EnableWebMvc.
4.2 扩展SpringMVC 1 2 3 4 5 6 7 <mvc:view-controller path="/hello" view-name="success"/> <mvc:interceptors> <mvc:interceptor> <mvc:mapping path="/hello"/> <bean></bean> </mvc:interceptor> </mvc:interceptors>
==编写一个配置类(@Configuration),是WebMvcConfigurerAdapter类型;不能标注(@EnableWebMvc)==
既保留了所有的自动配置,也能用我们扩展的配置;
1 2 3 4 5 6 7 8 9 10 @Configuration public class MyMvcConfig implements WebMvcConfigurer { @Override public void addViewControllers (ViewControllerRegistry registry) { registry.addViewController("/study" ).setViewName("success" ); } }
原理:
1)WebMvcAutoConfiguration是SpringMVC的自动配置类
2)在做其他自动配置时会导入;@Import(EnableWebMvcConfiguration.class)
1 2 3 4 5 6 7 8 9 10 11 12 13 14 15 16 17 18 19 20 21 22 @Configuration(proxyBeanMethods = false) public static class EnableWebMvcConfiguration extends DelegatingWebMvcConfiguration implements ResourceLoaderAware { private final WebMvcConfigurerComposite configurers = new WebMvcConfigurerComposite (); @Autowired(required = false) public void setConfigurers (List<WebMvcConfigurer> configurers) { if (!CollectionUtils.isEmpty(configurers)) { this .configurers.addWebMvcConfigurers(configurers); } } }
3)容器中所有的WebMvcConfiguration都会一起起作用;
4)我们的配置也会被调用
效果:SpringMVC的自动配置和我们的扩展配置都会起作用;
4.3 全面接管SpringMVC SpringBoot对SpringMVC的自动配置不需要了,所有都是我们自己配;所有的SpringMVC的自动配置都失效了
我们需要在配置类中添加@EnableWebMvc即可;
1 2 3 4 5 6 7 8 9 10 11 @EnableWebMvc @Configuration public class MyMvcConfig implements WebMvcConfigurer { @Override public void addViewControllers (ViewControllerRegistry registry) { registry.addViewController("/study" ).setViewName("success" ); } }
原理:
为什么@EnableWebMvc自动配置就失效了;
1)EnableWebMvc的核心
1 2 3 4 5 @Import(DelegatingWebMvcConfiguration.class) public @interface EnableWebMvc {}
2)
1 2 3 4 5 @Configuration(proxyBeanMethods = false) public class DelegatingWebMvcConfiguration extends WebMvcConfigurationSupport {}
3)
1 2 3 4 5 6 7 8 9 10 11 12 @Configuration(proxyBeanMethods = false) @ConditionalOnWebApplication(type = Type.SERVLET) @ConditionalOnClass({Servlet.class, DispatcherServlet.class, WebMvcConfigurer.class}) @ConditionalOnMissingBean(WebMvcConfigurationSupport.class) @AutoConfigureOrder(Ordered.HIGHEST_PRECEDENCE + 10) @AutoConfigureAfter({DispatcherServletAutoConfiguration.class, TaskExecutionAutoConfiguration.class, ValidationAutoConfiguration.class}) public class XxConfig {}
4)@EnableWebMvc将WebMvcConfigurationSupport组件导入进来了;
5)导入到的WebMvcConfigurationSupport只是SpringMVC最基本的功能;
5. 如何修改SpringBoot的默认配置 模式:
1)SpringBoot在自动配置很多组件的时候,先看容器中有没有用户自己配置的(@Bean、@Component)如果有就用用户配置的,如果没有,才自动配置;如果某些组件可以有多个(ViewResolver)将用户配置的和自己默认的组合起来;
2)在SpringBoot中会有非常多的xxxConfigurer帮助我们进行扩展配置;
3)在SpringBoot中会有很多的xxxCustomizer帮助我们进行配置;
6. RestfulCRUD 6.1 默认访问首页 1 2 3 4 5 6 7 8 9 10 11 12 13 14 15 16 17 18 19 20 21 22 23 @Configuration public class MyMvcConfig implements WebMvcConfigurer { @Override public void addViewControllers (ViewControllerRegistry registry) { registry.addViewController("/study" ).setViewName("success" ); } @Bean public WebMvcConfigurer webMvcConfigurer () { WebMvcConfigurer mvcConfigurer = new WebMvcConfigurer () { @Override public void addViewControllers (ViewControllerRegistry registry) { registry.addViewController("/" ).setViewName("login" ); registry.addViewController("/index.html" ).setViewName("login" ); } }; return mvcConfigurer; } }
6.2 国际化 1)编写国际化配置文件
2)使用ResourceBundleMessageSource管理国际化资源文件
3)在页面使用fmt:message去除国际化内容
步骤:
1)编写国际化配置文件,抽取页面需要显示的国际化消息
2)SpringBoot自动配置好了管理国际化资源文件的组件
1 2 3 4 5 6 7 8 9 10 11 12 13 14 15 16 17 18 19 20 21 22 23 24 25 26 27 28 29 30 31 32 33 34 35 36 37 38 39 40 41 42 43 44 45 @EnableConfigurationProperties public class MessageSourceAutoConfiguration { private static final Resource[] NO_RESOURCES = {}; @Bean @ConfigurationProperties(prefix = "spring.messages") public MessageSourceProperties messageSourceProperties () { return new MessageSourceProperties (); } @Bean public MessageSource messageSource (MessageSourceProperties properties) { ResourceBundleMessageSource messageSource = new ResourceBundleMessageSource (); if (StringUtils.hasText(properties.getBasename())) { messageSource.setBasenames(StringUtils .commaDelimitedListToStringArray( StringUtils.trimAllWhitespace(properties.getBasename()))); } if (properties.getEncoding() != null ) { messageSource.setDefaultEncoding(properties.getEncoding().name()); } messageSource.setFallbackToSystemLocale(properties.isFallbackToSystemLocale()); Duration cacheDuration = properties.getCacheDuration(); if (cacheDuration != null ) { messageSource.setCacheMillis(cacheDuration.toMillis()); } messageSource.setAlwaysUseMessageFormat(properties.isAlwaysUseMessageFormat()); messageSource.setUseCodeAsDefaultMessage(properties.isUseCodeAsDefaultMessage()); return messageSource; } public class MessageSourceProperties { private String basename = "messages" ; } }
3)去页面获取国际化的值;
1 2 3 4 5 6 7 8 9 10 11 12 13 14 15 16 17 18 19 20 21 22 23 24 25 26 27 28 29 30 31 32 33 34 35 36 37 38 39 40 41 <!DOCTYPE html > <html lang ="en" xmlns:th ="http://www.thymeleaf.org" > <head > <meta http-equiv ="Content-Type" content ="text/html; charset=UTF-8" > <meta name ="viewport" content ="width=device-width, initial-scale=1, shrink-to-fit=no" > <meta name ="description" content ="" > <meta name ="author" content ="" > <title > Signin Template for Bootstrap</title > <link href ="asserts/css/bootstrap.min.css" th:href ="@{/webjars/bootstrap/4.4.1/css/bootstrap.min.css}" rel ="stylesheet" > <link href ="asserts/css/signin.css" th:href ="@{/asserts/css/signin.css}" rel ="stylesheet" > </head > <body class ="text-center" > <form class ="form-signin" action ="dashboard.html" > <img class ="mb-4" src ="asserts/img/bootstrap-solid.svg" th:src ="@{/asserts/img/bootstrap-solid.svg}" alt ="" width ="72" height ="72" > <h1 class ="h3 mb-3 font-weight-normal" th:text ="#{login.tip}" > Please sign in</h1 > <label class ="sr-only" > Username</label > <input type ="text" class ="form-control" placeholder ="Username" th:placeholder ="#{login.username}" required ="" autofocus ="" > <label class ="sr-only" > Password</label > <input type ="password" class ="form-control" th:placeholder ="#{login.password}" placeholder ="Password" required ="" > <div class ="checkbox mb-3" > <label > <input type ="checkbox" value ="remember-me" /> [[#{login.remember}]] </label > </div > <button class ="btn btn-lg btn-primary btn-block" type ="submit" th:text ="#{login.btn}" > Sign in </button > <p class ="mt-5 mb-3 text-muted" > © 2017-2018</p > <a class ="btn btn-sm" > 中文</a > <a class ="btn btn-sm" > English</a > </form > </body > </html >
效果:根据浏览器语言设置的信息切换了国际化
原理:
国际化Locale(区域信息对象)、LocaleReslover(获取区域信息对象)
1 2 3 4 5 6 7 8 9 10 11 12 13 14 15 class Xx { @Bean @ConditionalOnMissingBean @ConditionalOnProperty(prefix = "spring.mvc", name = "locale") public LocaleResolver localeResolver () { if (this .mvcProperties.getLocaleResolver() == WebMvcProperties.LocaleResolver.FIXED) { return new FixedLocaleResolver (this .mvcProperties.getLocale()); } AcceptHeaderLocaleResolver localeResolver = new AcceptHeaderLocaleResolver (); localeResolver.setDefaultLocale(this .mvcProperties.getLocale()); return localeResolver; } }
4)点击链接切换国际化
1 2 3 4 5 6 7 8 9 10 11 12 13 14 15 16 17 18 19 20 21 22 23 24 25 26 27 28 public class MyLocaleResolver implements LocaleResolver { @Override public Locale resolveLocale (HttpServletRequest request) { String l = request.getParameter("l" ); Locale locale = Locale.getDefault(); if (!StringUtils.isEmpty(l)) { String[] split = l.split("_" ); if (split != null && split.length > 1 ) { locale = new Locale (split[0 ], split[1 ]); } } return locale; } @Override public void setLocale (HttpServletRequest request, HttpServletResponse response, Locale locale) { } }
6.3 登录 开发期间模板引擎页面修改以后,要实时生效
1)禁用模板引擎的缓存 spring.thymeleaf.cache=false
2)页面修改完成以后重新编译 Ctrl + F9
登录错误消息的显示
1 2 <p style ="color: red" th:text ="${msg}" th:if ="${not #strings.isEmpty(msg)}" />
6.4 拦截器进行登录检查 1 2 3 4 5 6 7 8 9 10 11 12 13 14 15 16 17 18 19 20 21 22 23 24 25 26 27 28 29 30 31 32 33 34 35 36 37 38 39 40 41 42 43 44 45 public class LoginHandlerInterceptor implements HandlerInterceptor { @Override public boolean preHandle (HttpServletRequest request, HttpServletResponse response, Object handler) throws Exception { Object user = request.getSession().getAttribute("loginUser" ); if (user == null ) { request.setAttribute("msg" , "没有权限,请先登录" ); request.getRequestDispatcher("/index.html" ).forward(request, response); return false ; } else { return true ; } } } public class Xx { @Bean public WebMvcConfigurer webMvcConfigurer () { WebMvcConfigurer mvcConfigurer = new WebMvcConfigurer () { @Override public void addViewControllers (ViewControllerRegistry registry) { registry.addViewController("/" ).setViewName("login" ); registry.addViewController("/index.html" ).setViewName("login" ); registry.addViewController("/main.html" ).setViewName("dashboard" ); } @Override public void addInterceptors (InterceptorRegistry registry) { registry.addInterceptor(new LoginHandlerInterceptor ()).addPathPatterns("/**" ) .excludePathPatterns("/" , "/index.html" , "/user/login" ) .excludePathPatterns("/webjars/**" , "/asserts/**" ); } }; return mvcConfigurer; } }
6.5 CRUD-员工列表 实验要求:
1)RestfulCRUD:CRUD满足Rest风格;
URI:/资源名称/资源标识 HTTP请求方式区分对资源CRUD操作
普通CRUD
RestfulCRUD
查询
getEmp
emp — GET
添加
addEmp?xxx
emp — POST
修改
updateEmp?id=xxx&xxx
emp/{id} — PUT
删除
deleteEmp?id=1
emp/{id} — DELETE
2)实验请求架构
请求URI
请求方式
查询所有员工
emps
GET
查询某个员工
emp/{id}
GET
添加页面
emp
GET
添加员工
emp
POST
来到修改页面(查出员工进行信息回显)
emp/{id}
GET
修改员工
emp/{id}
PUT
删除员工
emp/{id}
DELETE
3)员工列表
thymeleaf公共页面元素抽取
1 2 3 4 5 6 7 8 9 10 11 12 13 14 1. 抽取公共片段 <div th:fragment ="copy" > © 2011 The Good Thymes Virtual Grocery </div > 2. 引入公共片段 <div th:insert ="~{footer :: copy}" > </div > ~{templatename::selector}:模板名::选择器 ~{templatename::fragmentname}:模板名::片段名 3. 默认效果 insert的功能片段在div标签中 如果使用th:insert等属性引入,可以不写 ~{}; 行内写法可以加上 [[~{}]];[(~{})];
三种引入功能片段的th属性:
th:insert :将公共片段整个插入到声明的引用中
th:replace :将引入元素替换为公共片段
th:include :将被引入片段的内容包含进这个标签中
1 2 3 4 5 6 7 8 9 10 11 12 13 14 15 16 17 18 19 20 21 22 23 24 25 26 27 28 <footer th:fragment ="copy" > © 2011 The Good Thymes Virtual Grocery </footer > 引入方式 <body > ... <div th:insert ="footer :: copy" > </div > <div th:replace ="footer :: copy" > </div > <div th:include ="footer :: copy" > </div > </body > 效果 <body > ... <div > <footer > © 2011 The Good Thymes Virtual Grocery </footer > </div > <footer > © 2011 The Good Thymes Virtual Grocery </footer > <div > © 2011 The Good Thymes Virtual Grocery </div > </body
引入片段的时候传入参数
1 2 3 4 5 6 7 8 9 10 11 12 13 14 15 16 17 18 19 20 <nav class ="col-md-2 d-none d-md-block bg-light sidebar" id ="sidebar" > <div class ="sidebar-sticky" > <ul class ="nav flex-column" > <li class ="nav-item" > <a class ="nav-link active" th:class ="${activeUri=='main.html'?'nav-link active':'nav-link'}" href ="#" th:href ="@{/main.html}" > <svg xmlns ="http://www.w3.org/2000/svg" width ="24" height ="24" viewBox ="0 0 24 24" fill ="none" stroke ="currentColor" stroke-width ="2" stroke-linecap ="round" stroke-linejoin ="round" class ="feather feather-home" > <path d ="M3 9l9-7 9 7v11a2 2 0 0 1-2 2H5a2 2 0 0 1-2-2z" > </path > <polyline points ="9 22 9 12 15 12 15 22" > </polyline > </svg > Dashboard <span class ="sr-only" > (current)</span > </a > </li > <div th:replace ="commons/bar::#sidebar(activeUri='emps')" > </div >
6.6 CRUD-员工添加 添加页面
1 2 3 4 5 6 7 8 9 10 11 12 13 14 15 16 17 18 19 20 21 22 23 24 25 26 27 28 29 30 31 32 33 34 35 36 37 <form > <div class ="form-group" > <label > LastName</label > <input type ="text" class ="form-control" placeholder ="zhangsan" > </div > <div class ="form-group" > <label > Email</label > <input type ="email" class ="form-control" placeholder ="zhangsan@atguigu.com" > </div > <div class ="form-group" > <label > Gender</label > <br /> <div class ="form-check form-check-inline" > <input class ="form-check-input" type ="radio" name ="gender" value ="1" > <label class ="form-check-label" > 男</label > </div > <div class ="form-check form-check-inline" > <input class ="form-check-input" type ="radio" name ="gender" value ="0" > <label class ="form-check-label" > 女</label > </div > </div > <div class ="form-group" > <label > department</label > <select class ="form-control" > <option > 1</option > <option > 2</option > <option > 3</option > <option > 4</option > <option > 5</option > </select > </div > <div class ="form-group" > <label > Birth</label > <input type ="text" class ="form-control" placeholder ="zhangsan" > </div > <button type ="submit" class ="btn btn-primary" > 添加</button > </form >
提交的数据格式不对:生日;日期
2020/1/1;2020-1-1;2020.1.1
日期格式化;SpringMVC将页面提交的值需要转换为指定的类型;
2020.1.1—Date;类型转换,格式化;
默认日期是按照/的方式;
6.7 CRUD-员工修改 修改添加二合一表单
1 2 3 4 5 6 7 8 9 10 11 12 13 14 15 16 17 18 19 20 21 22 23 24 25 26 27 28 29 30 31 32 33 34 35 36 37 38 39 40 41 42 43 44 45 46 47 48 49 <form th:action ="@{/emp}" method ="post" > <input type ="hidden" name ="_method" value ="put" th:if ="${emp!=null}" /> <input type ="hidden" name ="id" th:if ="${emp!=null}" th:value ="${emp.id}" > <div class ="form-group" > <label > LastName</label > <input name ="lastName" type ="text" class ="form-control" placeholder ="zhangsan" th:value ="${emp!=null}?${emp.lastName}" > </div > <div class ="form-group" > <label > Email</label > <input name ="email" type ="email" class ="form-control" placeholder ="zhangsan@atguigu.com" th:value ="${emp!=null}?${emp.email}" > </div > <div class ="form-group" > <label > Gender</label > <br /> <div class ="form-check form-check-inline" > <input class ="form-check-input" type ="radio" name ="gender" value ="1" th:checked ="${emp!=null}?${emp.gender==1}" > <label class ="form-check-label" > 男</label > </div > <div class ="form-check form-check-inline" > <input class ="form-check-input" type ="radio" name ="gender" value ="0" th:checked ="${emp!=null}?${emp.gender==0}" > <label class ="form-check-label" > 女</label > </div > </div > <div class ="form-group" > <label > department</label > <select class ="form-control" name ="department.id" > <option th:selected ="${emp!=null}?${dept.id == emp.department.id}" th:value ="${dept.id}" th:each ="dept:${depts}" th:text ="${dept.departmentName}" > 1 </option > </select > </div > <div class ="form-group" > <label > Birth</label > <input name ="birth" type ="text" class ="form-control" placeholder ="zhangsan" th:value ="${emp!=null}?${#dates.format(emp.birth, 'yyyy-MM-dd HH:mm')}" > </div > <button type ="submit" class ="btn btn-primary" th:text ="${emp!=null}?'修改':'添加'" > 添加</button > </form >
6.8 CRUD-员工删除 1 2 3 4 5 6 7 8 9 10 11 12 13 14 15 16 17 18 19 20 21 22 23 <tr th:each ="emp:${emps}" > <td th:text ="${emp.id}" > </td > <td > [[${emp.lastName}]]</td > <td th:text ="${emp.email}" > </td > <td th:text ="${emp.gender}==0?'女':'男'" > </td > <td th:text ="${emp.department.departmentName}" > </td > <td th:text ="${#dates.format(emp.birth, 'yyyy-MM-dd HH:mm')}" > </td > <td > <a class ="btn btn-sm btn-primary" th:href ="@{/emp/}+${emp.id}" > 编辑</a > <button th:attr ="del_uri=@{/emp/}+${emp.id}" class ="btn btn-sm btn-danger deleteBtn" > 删除 </button > </td > </tr > <script > $(".deleteBtn" ).click (function ( $("#deleteEmpForm" ).attr ("action" , $(this ).attr ("del_uri" )).submit (); return false ; }); </script >
高版本注意配置 spring.mvc.hiddenmethod.filter.enabled=true属性
1 2 3 4 5 6 7 8 9 public class Xx { @Bean @ConditionalOnMissingBean(HiddenHttpMethodFilter.class) @ConditionalOnProperty(prefix = "spring.mvc.hiddenmethod.filter", name = "enabled", matchIfMissing = false) public OrderedHiddenHttpMethodFilter hiddenHttpMethodFilter () { return new OrderedHiddenHttpMethodFilter (); } }
7. 错误处理机制 7.1 SpringBoot默认的错误处理机制 默认效果:
1)返回一个默认的错误页面
浏览器发送请求的请求头:
2)如果是其他客户端,默认响应一个json数据
1 2 3 4 5 6 7 { "timestamp" : "2020-03-12T09:12:48.529+0000" , "status" : 404 , "error" : "Not Found" , "message" : "No message available" , "path" : "/crud/a" }
原理:
可以参照ErrorMvcAutoConfiguration;错误处理的自动配置;
给容器中添加了以下组件
1、DefaultErrorAttributes
1 2 3 4 5 6 7 8 9 10 11 12 13 public class Xx { public Map<String, Object> getErrorAttributes (WebRequest webRequest, boolean includeStackTrace) { Map<String, Object> errorAttributes = new LinkedHashMap (); errorAttributes.put("timestamp" , new Date ()); this .addStatus(errorAttributes, webRequest); this .addErrorDetails(errorAttributes, webRequest, includeStackTrace); this .addPath(errorAttributes, webRequest); return errorAttributes; } }
2、BasicErrorController;处理默认的/error请求
1 2 3 4 5 6 7 8 9 10 11 12 13 14 15 16 17 18 19 20 21 22 23 24 25 26 27 28 @Controller @RequestMapping("${server.error.path:${error.path:/error}}") public class BasicErrorController extends AbstractErrorControlle { @RequestMapping(produces = MediaType.TEXT_HTML_VALUE) public ModelAndView errorHtml (HttpServletRequest request, HttpServletResponse response) { HttpStatus status = getStatus(request); Map<String, Object> model = Collections .unmodifiableMap( getErrorAttributes(request, isIncludeStackTrace(request, MediaType.TEXT_HTML))); response.setStatus(status.value()); ModelAndView modelAndView = resolveErrorView(request, response, status, model); return (modelAndView != null ) ? modelAndView : new ModelAndView ("error" , model); } @RequestMapping public ResponseEntity<Map<String, Object>> error (HttpServletRequest request) { HttpStatus status = getStatus(request); if (status == HttpStatus.NO_CONTENT) { return new ResponseEntity <>(status); } Map<String, Object> body = getErrorAttributes(request, isIncludeStackTrace(request, MediaType.ALL)); return new ResponseEntity <>(body, status); } }
3、ErrorPageCustomizer
1 2 @Value("${error.path:/error}") private String path = "/error"; //系统出现错误以后来到error请求进行处理;web.xml注册的错误页面规则
4、DefaultErrorViewResolver
1 2 3 4 5 6 7 8 9 10 11 12 13 14 15 16 17 18 19 20 21 22 23 24 25 26 27 public class Xx { @Override public ModelAndView resolveErrorView (HttpServletRequest request, HttpStatus status, Map<String, Object> model) { ModelAndView modelAndView = resolve(String.valueOf(status.value()), model); if (modelAndView == null && SERIES_VIEWS.containsKey(status.series())) { modelAndView = resolve(SERIES_VIEWS.get(status.series()), model); } return modelAndView; } private ModelAndView resolve (String viewName, Map<String, Object> model) { String errorViewName = "error/" + viewName; TemplateAvailabilityProvider provider = this .templateAvailabilityProviders.getProvider( errorViewName, this .applicationContext); if (provider != null ) { return new ModelAndView (errorViewName, model); } return resolveResource(errorViewName, model); } }
步骤:
一旦系统出现4xx或者5xx之类的错误;ErrorPageCustomizer就会生效(定制错误的响应规则);就会来到/error请求;就会被BasicErrorController 处理;
1)响应页面;去哪个页面是由DefaultErrorViewResolver 解析得到的
1 2 3 4 5 6 7 8 9 10 11 12 13 14 15 public class Xx { protected ModelAndView resolveErrorView (HttpServletRequest request, HttpServletResponse response, HttpStatus status, Map<String, Object> model) { for (ErrorViewResolver resolver : this .errorViewResolvers) { ModelAndView modelAndView = resolver.resolveErrorView(request, status, model); if (modelAndView != null ) { return modelAndView; } } return null ; } }
7.2 如何定制错误响应 7.2.1 如何定制错误的页面; 1)有模板引擎的情况下; error/状态码;【将错误页面命名为 错误状态码.html
我们可以使用4xx和5xx作为错误页面的文件名来匹配这种类型的所有错误,精确优先(优先寻找精确状态码的);
页面信息能获取的信息:
timestamp:时间戳
status:状态码
error:错误提示
exception:异常对象
message:异常消息
errors:JSR303数据校验的的错误
2)没有模板引擎(模板引擎下没有错误文件),静态资源文件夹下找
3)以上都没有,就是默认来到springboot默认的错误提示页面;
7.2.2 如何定制错误的json数据 1)自定义异常处理&返回json数据
1 2 3 4 5 6 7 8 9 10 11 12 13 @ControllerAdvice public class MyExceptionHandler { @ResponseBody @ExceptionHandler(UserNotExistException.class) public Map<String, Object> handlerException () { Map<String, Object> map = new HashMap <>(); map.put("code" , "user.not.exist" ); return map; } }
2)转发到/error进行自适应响应效果处理
1 2 3 4 5 6 7 8 9 10 11 12 13 14 15 public class Xx { @ExceptionHandler(UserNotExistException.class) public String handlerException (ExceptionHandler e, HttpServletRequest request) { request.setAttribute("javax.servlet.error.status_code" , 400 ); Map<String, Object> map = new HashMap <>(); map.put("code" , "user.not.exist" ); return "forward:/error" ; } }
3)将我们的定制数据携带出去;
出现错误以后,会来到/error请求,会被BasicErrorController处理,响应出去可以获取的数据由getErrorAttributes()
1、完全来编写一个ErrorController的实现类【或者是编写AbstractErrorController的子类】,放到容器中;
2、页面上能用的数据,或者是json返回能用的数据都是通过errorAttributes.getErrorAttributes得到;
容器中DefaultErrorAttributes.errorAttributes()默认进行数据处理的;
自定义ErrorAttributes:
1 2 3 4 5 6 7 8 9 10 11 12 13 @Component public class MyErrorAttributes extends DefaultErrorAttributes { @Override public Map<String, Object> getErrorAttributes (WebRequest webRequest, boolean includeStackTrace) { Map<String, Object> map = super .getErrorAttributes(webRequest, includeStackTrace); map.put("user" , "hyr" ); return super .getErrorAttributes(webRequest, includeStackTrace); } }
最终的效果:响应是自适应的,可以通过定制ErrorAttributes改变需要返回的内容。
7.2.3 数据携带 1 2 3 4 5 6 7 8 9 10 11 12 13 14 15 16 17 18 19 20 21 22 23 24 25 26 27 28 public class Xx { @ExceptionHandler(UserNotExistException.class) public String handlerException (Exception e, HttpServletRequest request) { request.setAttribute("javax.servlet.error.status_code" , 400 ); Map<String, Object> map = new HashMap <>(); map.put("code" , "user.not.exist" ); request.setAttribute("ext" , map); return "forward:/error" ; } @Override public Map<String, Object> getErrorAttributes (WebRequest webRequest, boolean includeStackTrace) { Map<String, Object> map = super .getErrorAttributes(webRequest, includeStackTrace); map.put("user" , "hyr" ); Map<String, Object> ext = (Map<String, Object>) webRequest.getAttribute("ext" , 0 ); map.put("ext" , ext); return map; } }
8. 配置嵌入式servlet容器 SpringBoot默认是用的嵌入式servlet容器(Tomcat);
问题?
8.1 如何定制和修改servlet容器的相关配置; 1、修改和server有关的配置(ServerProperties);
1 2 3 4 5 6 7 8 server.port =8081 server.servlet.context-path =/crud server.tomcat.uri-encoding =UTF-8 server.xxx =server.tomcat.xxx =
2、编写一个WebServerFactoryCustomizer:嵌入式的Servlet容器的定制器;来修改Servlet容器的配置;
1 2 3 4 5 6 7 8 9 10 11 12 public class Xx { @Bean public WebServerFactoryCustomizer<ConfigurableWebServerFactory> webServerFactoryWebServerFactoryCustomizer () { return new WebServerFactoryCustomizer <ConfigurableWebServerFactory>() { @Override public void customize (ConfigurableWebServerFactory factory) { factory.setPort(8083 ); } }; } }
8.2 注册Servlet三大组件【Servlet、Filter、Listener】 由于SpringBoot默认是以jar包的方式启动嵌入式的Servlet容器来启动SpringBoot的web应用,没有web.xml文件。
注册三大组件用以下方式:
ServletRegistrationBean:
1 2 3 4 5 6 7 8 9 10 public class Xx { @Bean public ServletRegistrationBean<Servlet> myServlet () { ServletRegistrationBean<Servlet> registrationBean = new ServletRegistrationBean <Servlet>( new MyServlet (), "/myServlet" ); return registrationBean; } }
FilterRegistrationBean:
1 2 3 4 5 6 7 8 9 10 public class Xx { @Bean public FilterRegistrationBean myFilter () { FilterRegistrationBean<Filter> registrationBean = new FilterRegistrationBean <>(); registrationBean.setFilter(new MyFilter ()); registrationBean.setUrlPatterns(Arrays.asList("/hello" , "/myServlet" )); return registrationBean; } }
ServletListenerRegistrationBean:
1 2 3 4 5 6 7 8 9 public class Xx { @Bean public ServletListenerRegistrationBean myListener () { ServletListenerRegistrationBean<MyListener> registrationBean = new ServletListenerRegistrationBean <>( new MyListener ()); return registrationBean; } }
SpringBoot帮我们自动配置SpringMVC的时候,自动的注册SpringMVC的前段控制器;DispatcherServlet;
1 2 3 4 5 6 7 8 9 10 11 12 13 14 15 16 17 18 public class Xx { @Bean(name = DEFAULT_DISPATCHER_SERVLET_REGISTRATION_BEAN_NAME) @ConditionalOnBean(value = DispatcherServlet.class, name = DEFAULT_DISPATCHER_SERVLET_BEAN_NAME) public DispatcherServletRegistrationBean dispatcherServletRegistration ( DispatcherServlet dispatcherServlet, WebMvcProperties webMvcProperties, ObjectProvider<MultipartConfigElement> multipartConfig) { DispatcherServletRegistrationBean registration = new DispatcherServletRegistrationBean ( dispatcherServlet, webMvcProperties.getServlet().getPath()); registration.setName(DEFAULT_DISPATCHER_SERVLET_BEAN_NAME); registration.setLoadOnStartup(webMvcProperties.getServlet().getLoadOnStartup()); multipartConfig.ifAvailable(registration::setMultipartConfig); return registration; } }
8.3 替换为其他嵌入式Servlet容器
默认支持:
Tomcat(默认使用)
1 2 3 4 5 <dependency > <groupId > org.springframework.boot</groupId > <artifactId > spring-boot-starter-web</artifactId > </dependency >
Jetty
1 2 3 4 5 6 7 8 9 10 11 12 13 14 15 <dependency> <groupId>org.springframework.boot</groupId> <artifactId>spring-boot-starter-web</artifactId> <exclusions> <exclusion> <artifactId>spring-boot-starter-tomcat</artifactId> <groupId>org.springframework.boot</groupId> </exclusion> </exclusions> </dependency> <dependency> <artifactId>spring-boot-starter-jetty</artifactId> <groupId>org.springframework.boot</groupId> </dependency>
Undertow
1 2 3 4 5 6 7 8 9 10 11 12 13 14 15 <dependency> <groupId>org.springframework.boot</groupId> <artifactId>spring-boot-starter-web</artifactId> <exclusions> <exclusion> <artifactId>spring-boot-starter-tomcat</artifactId> <groupId>org.springframework.boot</groupId> </exclusion> </exclusions> </dependency> <dependency> <artifactId>spring-boot-starter-undertow</artifactId> <groupId>org.springframework.boot</groupId> </dependency>
Netty
8.4 嵌入式Servlet容器自动配置原理 EmbeddedWebServerFactoryCustomizerAutoConfiguration:嵌入式servlet容器自动配置
1 2 3 4 5 6 7 8 9 10 11 12 13 14 15 16 17 18 19 @Configuration(proxyBeanMethods = false) @ConditionalOnWebApplication @EnableConfigurationProperties(ServerProperties.class) public class EmbeddedWebServerFactoryCustomizerAutoConfiguration { @Configuration(proxyBeanMethods = false) @ConditionalOnClass({Tomcat.class, UpgradeProtocol.class}) public static class TomcatWebServerFactoryCustomizerConfiguration { @Bean public TomcatWebServerFactoryCustomizer tomcatWebServerFactoryCustomizer ( Environment environment, ServerProperties serverProperties) { return new TomcatWebServerFactoryCustomizer (environment, serverProperties); } } }
8.5 嵌入式Servlet容器启动原理 什么时候创建嵌入式的Servlet容器工厂?什么时候获取嵌入式的Servlet容器并启动Tomcat;
获取嵌入式的Servlet容器工厂:
1)SpringBoot应用启动运行run方法
2)refreshContext(context);SpringBoot刷新IOC容器【创建IOC容器对象,并初始化容器,创建容器中的每一个组件】;如果是web应用创建AnnotationConfigEmbeddedWebApplicationContext ,否则:AnnotationConfigApplicationContext
3)refresh(context);刷新刚才创建好的ioc容器;
4)onRefresh(); web的ioc容器重写了onRefresh方法
5)webioc容器会创建嵌入式的Servlet容器;createEmbeddedServletContainer ();
6)获取嵌入式的Servlet容器工厂:
EmbeddedServletContainerFactory containerFactory = getEmbeddedServletContainerFactory();
从ioc容器中获取EmbeddedServletContainerFactory 组件;**TomcatEmbeddedServletContainerFactory**创建对象,后置处理器一看是这个对象,就获取所有的定制器来先定制Servlet容器的相关配置;
7)使用容器工厂获取嵌入式的Servlet容器**:this.embeddedServletContainer = containerFactory
8)嵌入式的Servlet容器创建对象并启动Servlet容器;
先启动嵌入式的Servlet容器,再将ioc容器中剩下没有创建出的对象获取出来;
==IOC容器启动创建嵌入式的Servlet容器==
9. 使用外置的servlet容器 嵌入式Servlet容器:jar
优点:简单,便携;
缺点:默认不支持JSP、优化定制比较复杂(使用定制器【ServerProperties、自定义】,自己编写嵌入式Servlet容器的创建工厂);
外置的Servlet容器:外面安装Tomcat—应用war包的方式打包;
9.1 步骤 1)必须创建一个war项目;(利用idea创建好目录结构)
2)将嵌入式的Tomcat指定为provided;
1 2 3 4 5 6 <dependency > <groupId > org.springframework.boot</groupId > <artifactId > spring-boot-starter-tomcat</artifactId > <scope > provided</scope > </dependency >
3)必须编写一个SpringBootServletInitializer 的子类,并调用configure方法
1 2 3 4 5 6 7 8 9 public class ServletInitializer extends SpringBootServletInitializer { @Override protected SpringApplicationBuilder configure (SpringApplicationBuilder application) { return application.sources(SpringBoot04WebJspApplication.class); } }
4)启动服务器就可以使用;
9.2 原理 jar包:执行SpringBoot主类的main方法,启动ioc容器,创建嵌入式的Servlet容器;
war包:启动服务器,服务器启动SpringBoot应用 【SpringBootServletInitializer】,启动ioc容器;
servlet3.0(Spring注解版):
8.2.4 Shared libraries / runtimes pluggability:
规则:
服务器启动(web应用启动)会创建当前web应用里面每一个jar包里面ServletContainerInitializer实例;
ServletContainerInitializer的实现放在jar包的META-INF/services文件夹下,有一个名为javax.servlet.ServletContainerInitializer的文件,内容就是ServletContainerInitializer的实现类的全类名;
还可以使用@HandlesTypes,在应用启动的时候加载我们感兴趣的类;
流程:
启动Tomcat
org\springframework\spring-web\5.2.4.RELEASE\spring-web-5.2.4.RELEASE.jar!org.springframework.web.SpringServletContainerInitializer
SpringServletContainerInitializer将@HandlesTypes(WebApplicationInitializer.class)
每一个WebApplicationInitializer都调用自己的onStartup;
相当于我们的SpringBootServletInitializer的类会被创建对象,并执行onStartup方法;
SpringBootServletInitializer实例执行onStartup的时候会createRootApplicationContext;创建容器;
1 2 3 4 5 6 7 8 9 10 11 12 13 14 15 16 17 18 19 20 21 22 23 24 25 26 27 28 29 30 31 32 33 34 35 36 37 38 39 40 41 public class Xx { protected WebApplicationContext createRootApplicationContext (ServletContext servletContext) { SpringApplicationBuilder builder = this .createSpringApplicationBuilder(); builder.main(this .getClass()); ApplicationContext parent = this .getExistingRootWebApplicationContext(servletContext); if (parent != null ) { this .logger.info("Root context already created (using as parent)." ); servletContext.setAttribute( WebApplicationContext.ROOT_WEB_APPLICATION_CONTEXT_ATTRIBUTE, (Object) null ); builder.initializers(new ApplicationContextInitializer []{ new ParentContextApplicationContextInitializer (parent)}); } builder.initializers(new ApplicationContextInitializer []{ new ServletContextApplicationContextInitializer (servletContext)}); builder.contextClass(AnnotationConfigServletWebServerApplicationContext.class); builder = this .configure(builder); builder.listeners(new ApplicationListener []{ new SpringBootServletInitializer .WebEnvironmentPropertySourceInitializer( servletContext)}); SpringApplication application = builder.build(); if (application.getAllSources().isEmpty() && MergedAnnotations.from(this .getClass(), SearchStrategy.TYPE_HIERARCHY).isPresent(Configuration.class)) { application.addPrimarySources(Collections.singleton(this .getClass())); } Assert.state(!application.getAllSources().isEmpty(), "No SpringApplication sources have been defined. Either override the configure method or add an @Configuration annotation" ); if (this .registerErrorPageFilter) { application.addPrimarySources( Collections.singleton(ErrorPageFilterConfiguration.class)); } return this .run(application); } }
7)Spring的应用就启动并且创建IOC容器
1 2 3 4 5 6 7 8 9 10 11 12 13 14 15 16 17 18 19 20 21 22 23 24 25 26 27 28 29 30 31 32 33 34 35 36 37 38 39 40 41 42 43 44 45 46 47 48 49 public class Xx { public ConfigurableApplicationContext run (String... args) { StopWatch stopWatch = new StopWatch (); stopWatch.start(); ConfigurableApplicationContext context = null ; Collection<SpringBootExceptionReporter> exceptionReporters = new ArrayList (); this .configureHeadlessProperty(); SpringApplicationRunListeners listeners = this .getRunListeners(args); listeners.starting(); Collection exceptionReporters; try { ApplicationArguments applicationArguments = new DefaultApplicationArguments (args); ConfigurableEnvironment environment = this .prepareEnvironment(listeners, applicationArguments); this .configureIgnoreBeanInfo(environment); Banner printedBanner = this .printBanner(environment); context = this .createApplicationContext(); exceptionReporters = this .getSpringFactoriesInstances(SpringBootExceptionReporter.class, new Class []{ConfigurableApplicationContext.class}, context); this .prepareContext(context, environment, listeners, applicationArguments, printedBanner); this .refreshContext(context); this .afterRefresh(context, applicationArguments); stopWatch.stop(); if (this .logStartupInfo) { (new StartupInfoLogger (this .mainApplicationClass)).logStarted( this .getApplicationLog(), stopWatch); } listeners.started(context); this .callRunners(context, applicationArguments); } catch (Throwable var10) { this .handleRunFailure(context, var10, exceptionReporters, listeners); throw new IllegalStateException (var10); } try { listeners.running(context); return context; } catch (Throwable var9) { this .handleRunFailure(context, var9, exceptionReporters, (SpringApplicationRunListeners) null ); throw new IllegalStateException (var9); } } }
==启动Servlet容器,再启动SpringBoot应用==
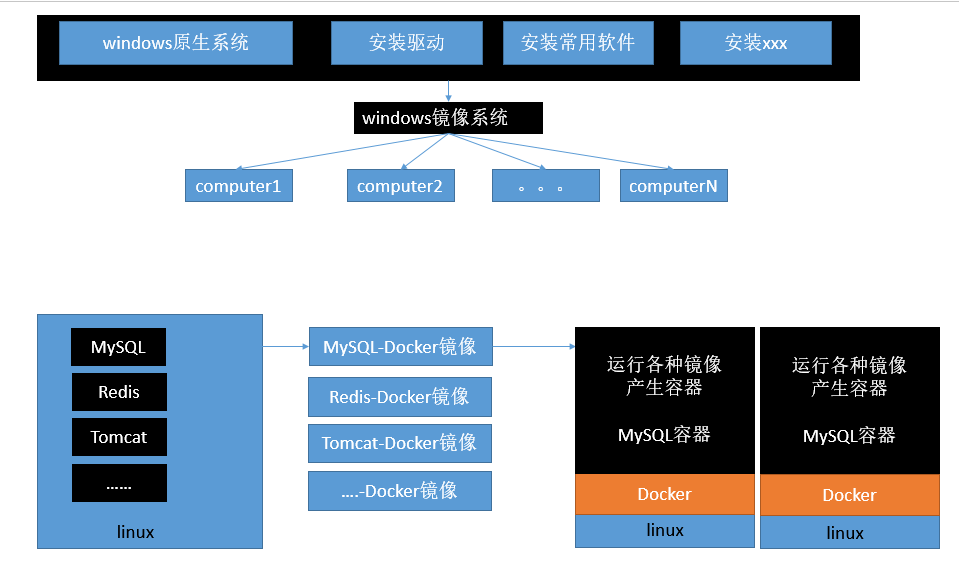
五、Docker 5.1 简介 Docker 是一个开源的应用容器引擎;是一个轻量级容器技术;
Docker支持将软件编译成一个镜像;然后在镜像中各种软件做好配置,将镜像发布出去,其他使用者可以直接使用这个镜像;
运行中的这个镜像称为容器,容器启动是非常快速的。
5.2 核心概念 docker主机(Host):安装了Docker程序的机器(Docker直接安装在操作系统之上);
docker客户端(Client):连接docker主机进行操作;
docker仓库(Registry):用来保存各种打包好的软件镜像;
docker镜像(Images):软件打包好的镜像;放在docker仓库中;
docker容器(Container):镜像启动后的实例称为一个容器;容器是独立运行的一个或一组应用
使用Docker的步骤:
1)安装Docker;
2)去Docker仓库找到这个软件对应的镜像;
3)使用Docker运行这个镜像,这个镜像就会生成一个Docker容器;
4)对容器的启动停止就是对软件的启动停止;
5.3 安装docker 5.3.1 安装Linux虚拟机 不介绍了;
5.3.2 在Linux上安装docker 步骤:
1 2 3 4 5 6 7 8 9 10 11 12 13 14 1、检查内核版本,必须是3.10及以上 uname -r 2、安装docker yum install docker 3、输入y确认安装 4、启动docker [root@localhost ~]## systemctl start docker [root@localhost ~]## docker -v Docker version 1.12.6, build 3e8e77d/1.12.6 5、开机启动docker [root@localhost ~]## systemctl enable docker Created symlink from /etc/systemd/system/multi-user.target.wants/docker.service to /usr/lib/systemd/system/docker.service. 6、停止docker systemctl stop docker
5.3.3 启用国内镜像 1)编辑:/etc/docker/daemon.json
1 2 3 4 5 { "registry-mirrors" : [ "https://docker.mirrors.ustc.edu.cn" ] }
2)重新启动docker服务
1 2 systemctl daemon-reload systemctl restart docker
5.4 Docker常用命令&操作 5.4.1 镜像操作
操作
命令
说明
检索
docker search 关键字 eg:docker search redis
我们经常去docker hub上检索镜像的详细信息,如镜像的TAG。
拉取
docker pull 镜像名:tag
:tag是可选的,tag表示标签,多为软件的版本,默认是latest
列表
docker images
查看所有本地镜像
删除
docker rmi image-id
删除指定的本地镜像
https://hub.docker.com/
5.4.2 容器操作 软件镜像 —- 运行镜像 —- 产生一个容器;
步骤:
1 2 3 4 5 6 7 8 9 10 11 12 13 14 15 16 17 18 19 20 21 22 23 24 25 26 27 28 29 30 1、搜索镜像 [root@localhost ~]## docker search tomcat 2、拉取镜像 [root@localhost ~]## docker pull tomcat 3、根据镜像启动容器 docker run --name mytomcat -d tomcat:latest 4、docker ps 查看运行中的容器 5、 停止运行中的容器 docker stop 容器的id 6、查看所有的容器 docker ps -a 7、启动容器 docker start 容器id 8、删除一个容器 docker rm 容器id 9、启动一个做了端口映射的tomcat [root@localhost ~]## docker run -d -p 8888:8080 tomcat -d:后台运行 -p: 将主机的端口映射到容器的一个端口 主机端口:容器内部的端口 10、为了演示简单关闭了linux的防火墙 service firewalld status ;查看防火墙状态 service firewalld stop:关闭防火墙 11、查看容器的日志 docker logs container-name/container-id 更多命令参看 https://docs.docker.com/engine/reference/commandline/docker/ 可以参考每一个镜像的文档
5.4.3 安装MySQL示例 1 [root@VM_0_9_centos ~]## docker pull mysql
错误的启动
1 2 3 4 5 6 7 8 9 10 11 12 13 14 15 16 [root@VM_0_9_centos ~]## docker run --name mysql1 -d mysql c37ba254d14d1917dbac6743e2a40c61df9cd29ddabfdc7dc270665cdbade41c mysql退出了 [root@VM_0_9_centos ~]## docker ps -a CONTAINER ID IMAGE COMMAND CREATED STATUS PORTS NAMES c37ba254d14d mysql "docker-entrypoint..." About a minute ago Exited (1) About a minute ago mysql1 10ff331c3f42 tomcat "catalina.sh run" 10 minutes ago Up 10 minutes 0.0.0.0:8888->8080/tcp tomcat1 //错误日志 [root@VM_0_9_centos ~]## docker logs mysql1 2020-03-17 06:24:59+00:00 [Note] [Entrypoint]: Entrypoint script for MySQL Server 8.0.19-1debian10 started. 2020-03-17 06:24:59+00:00 [Note] [Entrypoint]: Switching to dedicated user 'mysql' 2020-03-17 06:25:00+00:00 [Note] [Entrypoint]: Entrypoint script for MySQL Server 8.0.19-1debian10 started. 2020-03-17 06:25:00+00:00 [ERROR] [Entrypoint]: Database is uninitialized and password option is not specified You need to specify one of MYSQL_ROOT_PASSWORD, MYSQL_ALLOW_EMPTY_PASSWORD and MYSQL_RANDOM_ROOT_PASSWORD;这个三个参数必须指定一个
正确的启动
1 2 3 4 5 [root@VM_0_9_centos ~]## docker run --name mysql01 -e MYSQL_ROOT_PASSWORD=123456 -d mysql b874c56bec49fb43024b3805ab51e9097da779f2f572c22c695305dedd684c5f [root@VM_0_9_centos ~]## docker ps CONTAINER ID IMAGE COMMAND CREATED STATUS PORTS NAMES b874c56bec49 mysql "docker-entrypoint.sh" 4 seconds ago Up 3 seconds 3306/tcp mysql01
做了端口映射
1 2 3 4 5 [root@VM_0_9_centos ~]## docker run -p 3306:3306 --name mysql02 -e MYSQL_ROOT_PASSWORD=123456 -d mysql ad10e4bc5c6a0f61cbad43898de71d366117d120e39db651844c0e73863b9434 [root@VM_0_9_centos ~]## docker ps CONTAINER ID IMAGE COMMAND CREATED STATUS PORTS NAMES ad10e4bc5c6a mysql "docker-entrypoint.sh" 4 seconds ago Up 2 seconds 0.0.0.0:3306->3306/tcp mysql02
几个其他的高级操作
1 2 3 4 5 6 docker run --name mysql03 -v /conf/mysql:/etc/mysql/conf.d -e MYSQL_ROOT_PASSWORD=my-secret-pw -d mysql:tag 把主机的/conf/mysql文件夹挂载到 mysqldocker容器的/etc/mysql/conf.d文件夹里面 改mysql的配置文件就只需要把mysql配置文件放在自定义的文件夹下(/conf/mysql) docker run --name some-mysql -e MYSQL_ROOT_PASSWORD=my-secret-pw -d mysql:tag --character-set-server=utf8mb4 --collation-server=utf8mb4_unicode_ci 指定mysql的一些配置参数
切入docker命令:
1 docker exec -it mysql1 bash
六、SpringBoot与数据访问 6.1 JDBC 1 2 3 4 5 6 7 8 9 <dependency> <groupId>org.springframework.boot</groupId> <artifactId>spring-boot-starter-jdbc</artifactId> </dependency> <dependency> <groupId>mysql</groupId> <artifactId>mysql-connector-java</artifactId> <scope>runtime</scope> </dependency>
1 2 3 4 5 6 spring: datasource: username: root password: 123456 url: jdbc:mysql://192.168.15.22:3306/jdbc driver-class-name: com.mysql.jdbc.Driver
效果:
默认是用class com.zaxxer.hikari.HikariDataSource作为数据源;
数据源的相关配置都在DataSourceProperties里面;
自动配置原理:
org.springframework.boot.autoconfigure.jdbc:
1、参考DataSourceConfiguration,根据配置创建数据源,默认使用hikari连接池;可以使用spring.datasource.type指定自定义的数据源类型;
2、SpringBoot默认可以支持;
1 2 3 com.zaxxer.hikari.HikariDataSource org.apache.tomcat.jdbc.pool.DataSource org.apache.commons.dbcp2.BasicDataSource
3、自定义数据源类型
1 2 3 4 5 6 7 8 9 10 11 12 13 14 15 @Configuration(proxyBeanMethods = false) @ConditionalOnMissingBean(DataSource.class) @ConditionalOnProperty(name = "spring.datasource.type") static class Generic { @Bean DataSource dataSource (DataSourceProperties properties) { return properties.initializeDataSourceBuilder().build(); } }
4、DataSourceInitializer:ApplicationListener ;
作用:
1)、runSchemaScripts();运行建表语句;
2)、runDataScripts();运行插入数据的sql语句;
2.x版本需添加配置
1 2 3 spring: datasource: initialization-mode: always
默认只需要将文件命名为:
1 2 3 4 5 6 schema-*.sql、data-*.sql 默认规则:schema.sql,schema-all.sql; 可以使用 schema :- classpath:department.sql 指定位置
5、操作数据库:自动配置了JdbcTemplate操作数据库
6.2 整合Druid数据源 导入依赖
1 2 3 4 5 6 <dependency > <groupId > com.alibaba</groupId > <artifactId > druid</artifactId > <version > 1.1.20</version > </dependency >
配置文件
1 2 3 4 5 6 7 8 9 10 11 12 13 14 15 16 17 18 type: com.alibaba.druid.pool.DruidDataSource initialSize: 5 minIdle: 5 maxActive: 20 maxWait: 60000 timeBetweenEvictionRunsMillis: 60000 minEvictableIdleTimeMillis: 300000 validationQuery: SELECT 1 FROM DUAL testWhileIdle: true testOnBorrow: false testOnReturn: false poolPreparedStatements: true filters: stat,wall,log4j2 maxPoolPreparedStatementPerConnectionSize: 20 useGlobalDataSourceStat: true connectionProperties: druid.stat.mergeSql=true;druid.stat.slowSqlMillis=500
1 2 3 4 5 6 7 8 9 10 11 12 13 14 15 16 17 18 19 20 21 22 23 24 25 26 27 28 29 30 31 32 33 34 35 36 37 38 39 40 41 @Configuration public class DruidConfig { @ConfigurationProperties(prefix = "spring.datasource") @Bean public DruidDataSource druid () { return new DruidDataSource (); } @Bean public ServletRegistrationBean statServlet () { ServletRegistrationBean<StatViewServlet> bean = new ServletRegistrationBean <>( new StatViewServlet (), "/druid/*" ); Map<String, String> initParams = new HashMap <>(); initParams.put("loginUsername" , "admin" ); initParams.put("loginPassword" , "123456" ); initParams.put("allow" , "" ); initParams.put("deny" , "" ); bean.setInitParameters(initParams); return bean; } @Bean public FilterRegistrationBean webStatFilter () { FilterRegistrationBean bean = new FilterRegistrationBean (); bean.setFilter(new WebStatFilter ()); Map<String, String> initParams = new HashMap <>(); initParams.put("exclusions" , "*.js,*.css,/druid/*" ); bean.setInitParameters(initParams); bean.setUrlPatterns(Arrays.asList("/*" )); return bean; } }
6.3 整合MyBatis 1 2 3 4 5 6 <dependency > <groupId > org.mybatis.spring.boot</groupId > <artifactId > mybatis-spring-boot-starter</artifactId > <version > 2.1.2</version > </dependency >
步骤:
1)配置数据源相关属性(见上一节Druid)
2)给数据库建表
3)创建JavaBean
6.3.1 注解版 1 2 3 4 5 6 7 8 9 10 11 12 13 14 15 16 17 @Mapper public interface DepartmentMapper { @Select("select * from department where id = #{id}") Department getDeptById (Integer id) ; @Delete("delete form department where id = #{id}") int deleteDeptById (Integer id) ; @Options(useGeneratedKeys = true, keyProperty = "id") @Insert("insert into department(department_name) values(#{departmentName}) ") int insertDept (Department department) ; @Update("update department set department_name = #{departmentName} where id = #{id}") int updateDept (Department department) ; }
问题:
自定义MyBatis的配置规则;给容器中添加一个ConfigurationCustomizer;
1 2 3 4 5 6 7 8 9 10 11 12 13 14 15 @org .springframework.context.annotation.Configurationpublic class MyBatisConfig { @Bean public ConfigurationCustomizer configurationCustomizer () { return new ConfigurationCustomizer () { @Override public void customize (Configuration configuration) { configuration.setMapUnderscoreToCamelCase(true ); } }; } }
1 2 3 4 5 6 7 8 9 10 11 12 13 14 15 @MapperScan(value = "com.study.springboot.mapper") @org .springframework.context.annotation.Configurationpublic class MybatisConfig { @Bean public ConfigurationCustomizer configurationCustomizer () { return new ConfigurationCustomizer () { @Override public void customize (Configuration configuration) { configuration.setMapUnderscoreToCamelCase(true ); } }; } }
6.3.2 配置文件版 1 2 3 mybatis: config-location: classpath:mybatis/mybatis-config.xml 指定全局配置文件的位置 mapper-locations: classpath:mybatis/mapper/*.xml 指定sql映射文件的位置
更多使用参照
http://www.mybatis.org/spring-boot-starter/mybatis-spring-boot-autoconfigure/
6.4 整合SpringData JPA 6.4.1 SpringData简介
6.4.2 整合SpringData JPA JPA:ORM(Object Relational Mapping);
1)编写一个实体类(bean)和数据表进行映射,并且配置好映射关系;
1 2 3 4 5 6 7 8 9 10 11 12 13 14 15 @Entity @Table(name = "tbl_user") public class User { @Id @GeneratedValue(strategy = GenerationType.IDENTITY) private Integer id; @Column(name = "last_name", length = 50) private String lastName; @Column private String email; }
2)编写一个Dao接口来操作实体类对应的数据表(Repository);
1 2 3 4 public interface UserRepository extends JpaRepository <User, Integer> {}
3)基本的配置JpaProperties;
1 2 3 4 5 6 7 spring: jpa: hibernate: ddl-auto: update show-sql: true
七、启动配置原理 几个重要的事件回调机制
配置在META-INF/spring.factories
ApplicationContextInitializer
SpringApplicationRunListener
只需要放在ioc容器中
ApplicationRunner
CommandLineRunner
启动流程:
7.1 创建SpringApplication对象 1 2 3 4 5 6 7 8 9 10 11 12 13 14 15 16 17 18 19 20 21 22 23 24 25 26 27 public class Xx { public SpringApplication (ResourceLoader resourceLoader, Class<?>... primarySources) { this .sources = new LinkedHashSet (); this .bannerMode = Mode.CONSOLE; this .logStartupInfo = true ; this .addCommandLineProperties = true ; this .addConversionService = true ; this .headless = true ; this .registerShutdownHook = true ; this .additionalProfiles = new HashSet (); this .isCustomEnvironment = false ; this .lazyInitialization = false ; this .resourceLoader = resourceLoader; Assert.notNull(primarySources, "PrimarySources must not be null" ); this .primarySources = new LinkedHashSet (Arrays.asList(primarySources)); this .webApplicationType = WebApplicationType.deduceFromClasspath(); this .setInitializers(this .getSpringFactoriesInstances(ApplicationContextInitializer.class)); this .setListeners(this .getSpringFactoriesInstances(ApplicationListener.class)); this .mainApplicationClass = this .deduceMainApplicationClass(); } }
7.2 运行run方法 1 2 3 4 5 6 7 8 9 10 11 12 13 14 15 16 17 18 19 20 21 22 23 24 25 26 27 28 29 30 31 32 33 34 35 36 37 38 39 40 41 42 43 44 45 46 47 48 49 50 51 52 53 54 55 56 57 58 59 60 61 62 63 64 65 public class Xx { public ConfigurableApplicationContext run (String... args) { StopWatch stopWatch = new StopWatch (); stopWatch.start(); ConfigurableApplicationContext context = null ; Collection<SpringBootExceptionReporter> exceptionReporters = new ArrayList (); this .configureHeadlessProperty(); SpringApplicationRunListeners listeners = this .getRunListeners(args); listeners.starting(); Collection exceptionReporters; try { ApplicationArguments applicationArguments = new DefaultApplicationArguments (args); ConfigurableEnvironment environment = this .prepareEnvironment(listeners, applicationArguments); this .configureIgnoreBeanInfo(environment); Banner printedBanner = this .printBanner(environment); context = this .createApplicationContext(); exceptionReporters = this .getSpringFactoriesInstances(SpringBootExceptionReporter.class, new Class []{ConfigurableApplicationContext.class}, context); this .prepareContext(context, environment, listeners, applicationArguments, printedBanner); this .refreshContext(context); this .afterRefresh(context, applicationArguments); stopWatch.stop(); if (this .logStartupInfo) { (new StartupInfoLogger (this .mainApplicationClass)).logStarted( this .getApplicationLog(), stopWatch); } listeners.started(context); this .callRunners(context, applicationArguments); } catch (Throwable var10) { this .handleRunFailure(context, var10, exceptionReporters, listeners); throw new IllegalStateException (var10); } try { listeners.running(context); return context; } catch (Throwable var9) { this .handleRunFailure(context, var9, exceptionReporters, (SpringApplicationRunListeners) null ); throw new IllegalStateException (var9); } } }
7.3 事件监听机制 配置在META-INF/spring.factories
ApplicationContextInitializer
1 2 3 4 5 6 7 8 9 public class HelloApplicationContextInitializer implements ApplicationContextInitializer <ConfigurableApplicationContext> { @Override public void initialize (ConfigurableApplicationContext configurableApplicationContext) { System.out.println( "ConfigurableApplicationContext...initialize... " + configurableApplicationContext); } }
SpringApplicationRunListener
1 2 3 4 5 6 7 8 9 10 11 12 13 14 15 16 17 18 19 20 21 22 23 24 25 26 27 28 29 30 31 32 33 34 35 36 37 38 39 40 41 42 public class HelloSpringApplicationRunListeners implements SpringApplicationRunListener { public HelloSpringApplicationRunListeners (SpringApplication application, String[] args) { } @Override public void starting () { System.out.println("SpringApplicationRunListener...starting..." ); } @Override public void environmentPrepared (ConfigurableEnvironment environment) { Object o = environment.getSystemProperties().get("os.name" ); System.out.println("SpringApplicationRunListener...environmentPrepared... " + o); } @Override public void contextPrepared (ConfigurableApplicationContext context) { System.out.println("SpringApplicationRunListener...contextPrepared..." ); } @Override public void contextLoaded (ConfigurableApplicationContext context) { System.out.println("SpringApplicationRunListener...contextLoaded..." ); } @Override public void started (ConfigurableApplicationContext context) { System.out.println("SpringApplicationRunListener...started..." ); } @Override public void running (ConfigurableApplicationContext context) { System.out.println("SpringApplicationRunListener...running..." ); } @Override public void failed (ConfigurableApplicationContext context, Throwable exception) { System.out.println("SpringApplicationRunListener...failed..." ); } }
配置(META-INF/spring.factories)
1 2 3 4 5 6 org.springframework.context.ApplicationContextInitializer =\ com.study.springboot.listener.HelloApplicationContextInitializer org.springframework.boot.SpringApplicationRunListener =\ com.study.springboot.listener.HelloSpringApplicationRunListeners
只需要放在ioc容器中
ApplicationRunner
1 2 3 4 5 6 7 8 9 @Component public class HelloApplicationRunner implements ApplicationRunner { @Override public void run (ApplicationArguments args) throws Exception { System.out.println("ApplicationRunner...run..." ); } }
CommandLineRunner
1 2 3 4 5 6 7 8 9 @Component public class HelloCommandLineRunner implements CommandLineRunner { @Override public void run (String... args) throws Exception { System.out.println("CommandLineRunner...run... " + Arrays.asList(args)); } }
八、自定义starter starter:
1、这个场景需要使用到的依赖是什么?
2、如何编写自动配置?
1 2 3 4 5 6 7 8 9 10 11 12 13 @Configuration //指定这个类是一个配置类 @ConditionalOnXXX //在指定条件成立的情况下自动配置类生效 @AutoConfigureAfter //指定自动配置类的顺序 @Bean //给容器中添加组件 @ConfigurationPropertie //结合相关xxxProperties类来绑定相关的配置 @EnableConfigurationProperties //让xxxProperties生效加入到容器中 自动配置类要能加载 将需要启动就加载的自动配置类,配置在META-INF/spring.factories org.springframework.boot.autoconfigure.EnableAutoConfiguration=\ org.springframework.boot.autoconfigure.admin.SpringApplicationAdminJmxAutoConfiguration,\ org.springframework.boot.autoconfigure.aop.AopAutoConfiguration,\
3、模式:
启动器只用来做依赖导入;
专门来写一个自动配置模块;
启动器依赖自动配置;别人只需要引入启动器(starter)
mybatis-spring-boot-starter;自定义启动器名-spring-boot-starter
步骤:
1)启动器模块
1 2 3 4 5 6 7 8 9 10 11 12 13 14 15 16 17 18 19 20 21 <?xml version="1.0" encoding="UTF-8" ?> <project xmlns ="http://maven.apache.org/POM/4.0.0" xmlns:xsi ="http://www.w3.org/2001/XMLSchema-instance" xsi:schemaLocation ="http://maven.apache.org/POM/4.0.0 http://maven.apache.org/xsd/maven-4.0.0.xsd" > <modelVersion > 4.0.0</modelVersion > <groupId > com.study.starter</groupId > <artifactId > eutopia-spring-boot-starter</artifactId > <version > 1.0-SNAPSHOT</version > <dependencies > <dependency > <groupId > com.study.starter</groupId > <artifactId > eutopia-spring-boot-starter-autoconfigurer</artifactId > <version > 0.0.1-SNAPSHOT</version > </dependency > </dependencies > </project >
2)自动配置模块
1 2 3 4 5 6 7 8 9 10 11 12 13 14 15 16 17 18 19 20 21 22 23 24 25 26 27 28 29 30 <?xml version="1.0" encoding="UTF-8" ?> <project xmlns ="http://maven.apache.org/POM/4.0.0" xmlns:xsi ="http://www.w3.org/2001/XMLSchema-instance" xsi:schemaLocation ="http://maven.apache.org/POM/4.0.0 https://maven.apache.org/xsd/maven-4.0.0.xsd" > <modelVersion > 4.0.0</modelVersion > <parent > <groupId > org.springframework.boot</groupId > <artifactId > spring-boot-starter-parent</artifactId > <version > 2.2.5.RELEASE</version > <relativePath /> </parent > <groupId > com.study.starter</groupId > <artifactId > eutopia-spring-boot-starter-autoconfigurer</artifactId > <version > 0.0.1-SNAPSHOT</version > <name > eutopia-spring-boot-starter-autoconfigurer</name > <description > Demo project for Spring Boot</description > <properties > <java.version > 1.8</java.version > </properties > <dependencies > <dependency > <groupId > org.springframework.boot</groupId > <artifactId > spring-boot-starter</artifactId > </dependency > </dependencies > </project >
代码:
1 2 3 4 5 6 7 8 9 10 11 12 13 14 15 16 17 18 19 20 21 22 23 @ConfigurationProperties(prefix = "eutopia.hello") public class HelloProperties { private String prefix; private String suffix; public String getPrefix () { return prefix; } public void setPrefix (String prefix) { this .prefix = prefix; } public String getSuffix () { return suffix; } public void setSuffix (String suffix) { this .suffix = suffix; } }
1 2 3 4 5 6 7 8 9 10 11 12 13 14 15 16 17 public class HelloService { private HelloProperties helloProperties; public HelloProperties getHelloProperties () { return helloProperties; } public void setHelloProperties (HelloProperties helloProperties) { this .helloProperties = helloProperties; } public String sayHelloEutopia (String name) { return helloProperties.getPrefix() + "-" + name + "-" + helloProperties.getSuffix(); } }
1 2 3 4 5 6 7 8 9 10 11 12 13 14 15 16 @Configuration @ConditionalOnWebApplication @EnableConfigurationProperties(HelloProperties.class) public class HelloServiceAutoConfiguration { @Autowired HelloProperties helloProperties; @Bean public HelloService helloService () { HelloService helloService = new HelloService (); helloService.setHelloProperties(helloProperties); return helloService; } }
spring.factories
1 2 3 ## Auto Configure org.springframework.boot.autoconfigure.EnableAutoConfiguration=\ com.study.starter.HelloServiceAutoConfiguration